> ## Documentation Index
> Fetch the complete documentation index at: https://adadvisor.ai/docs/llms.txt
> Use this file to discover all available pages before exploring further.
# Setting Up Your MCP Client
> Step-by-step setup instructions for connecting Claude Code, Claude Desktop, ChatGPT, and other MCP-compatible AI clients to AdAdvisor's MCP server.
This page walks you through connecting your AI assistant to AdAdvisor's MCP server. Pick your client below and follow the instructions.
## Prerequisites
Before you start, make sure you have:
1. **An AdAdvisor account** with at least one connected Meta ad account. [Sign up here](https://app.adadvisor.ai) if you haven't already.
2. **An MCP-compatible AI client** installed (see the tabs below for supported clients).
3. **An API key** (optional). OAuth is the default and recommended auth method. If you prefer API key auth, create one in **Settings > MCP Server** before starting. See [Managing API Keys](/ai/managing-api-keys) for details.
## MCP server URL
All clients connect to the same server:
```
https://api.adadvisor.ai/mcp
```
## Authentication
AdAdvisor supports two authentication methods:
* **OAuth (recommended)**: Your client opens a browser window where you log in to AdAdvisor. The token is issued and refreshed automatically. No key management needed.
* **API Key**: Pass a key in the `Authorization` header. Useful for headless setups, CI/CD pipelines, or clients that don't support OAuth.
Both methods grant the same level of access. See [What is the MCP Server?](/ai/what-is-mcp-server) for more details on how auth works.
## Client setup
Claude Desktop supports MCP servers through its Connectors UI. No API key needed.
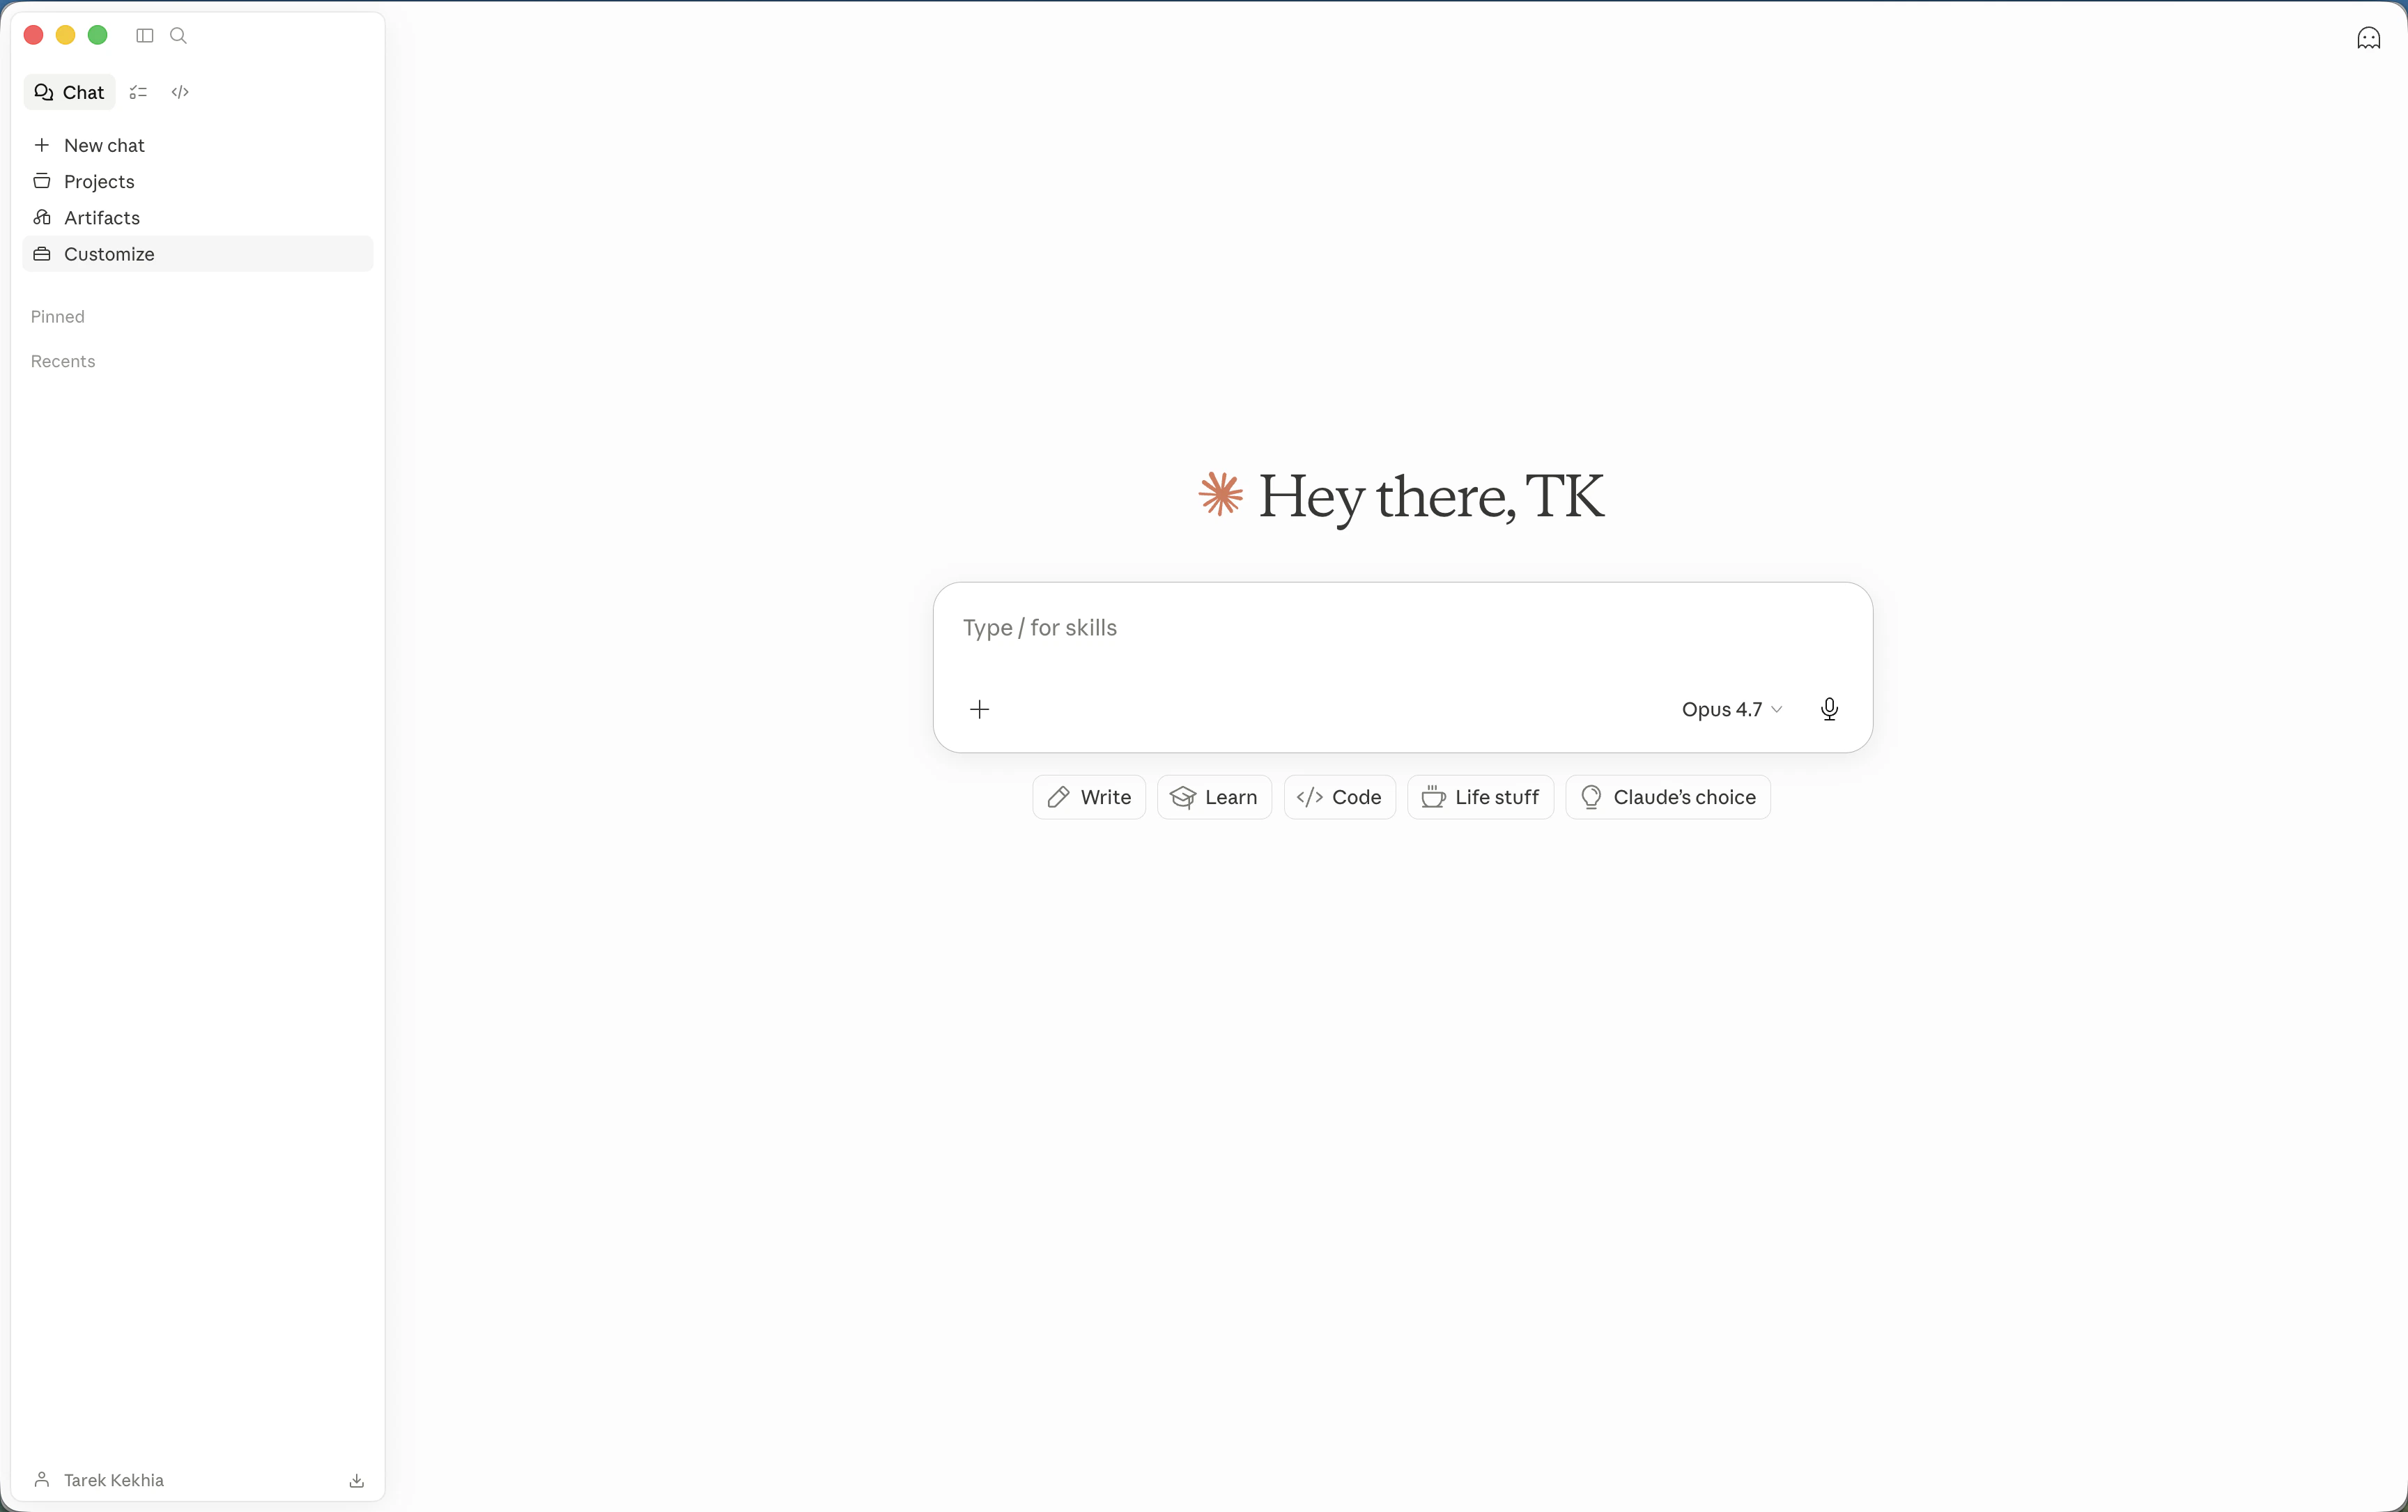
Open Claude Desktop and click **Customize** in the sidebar.
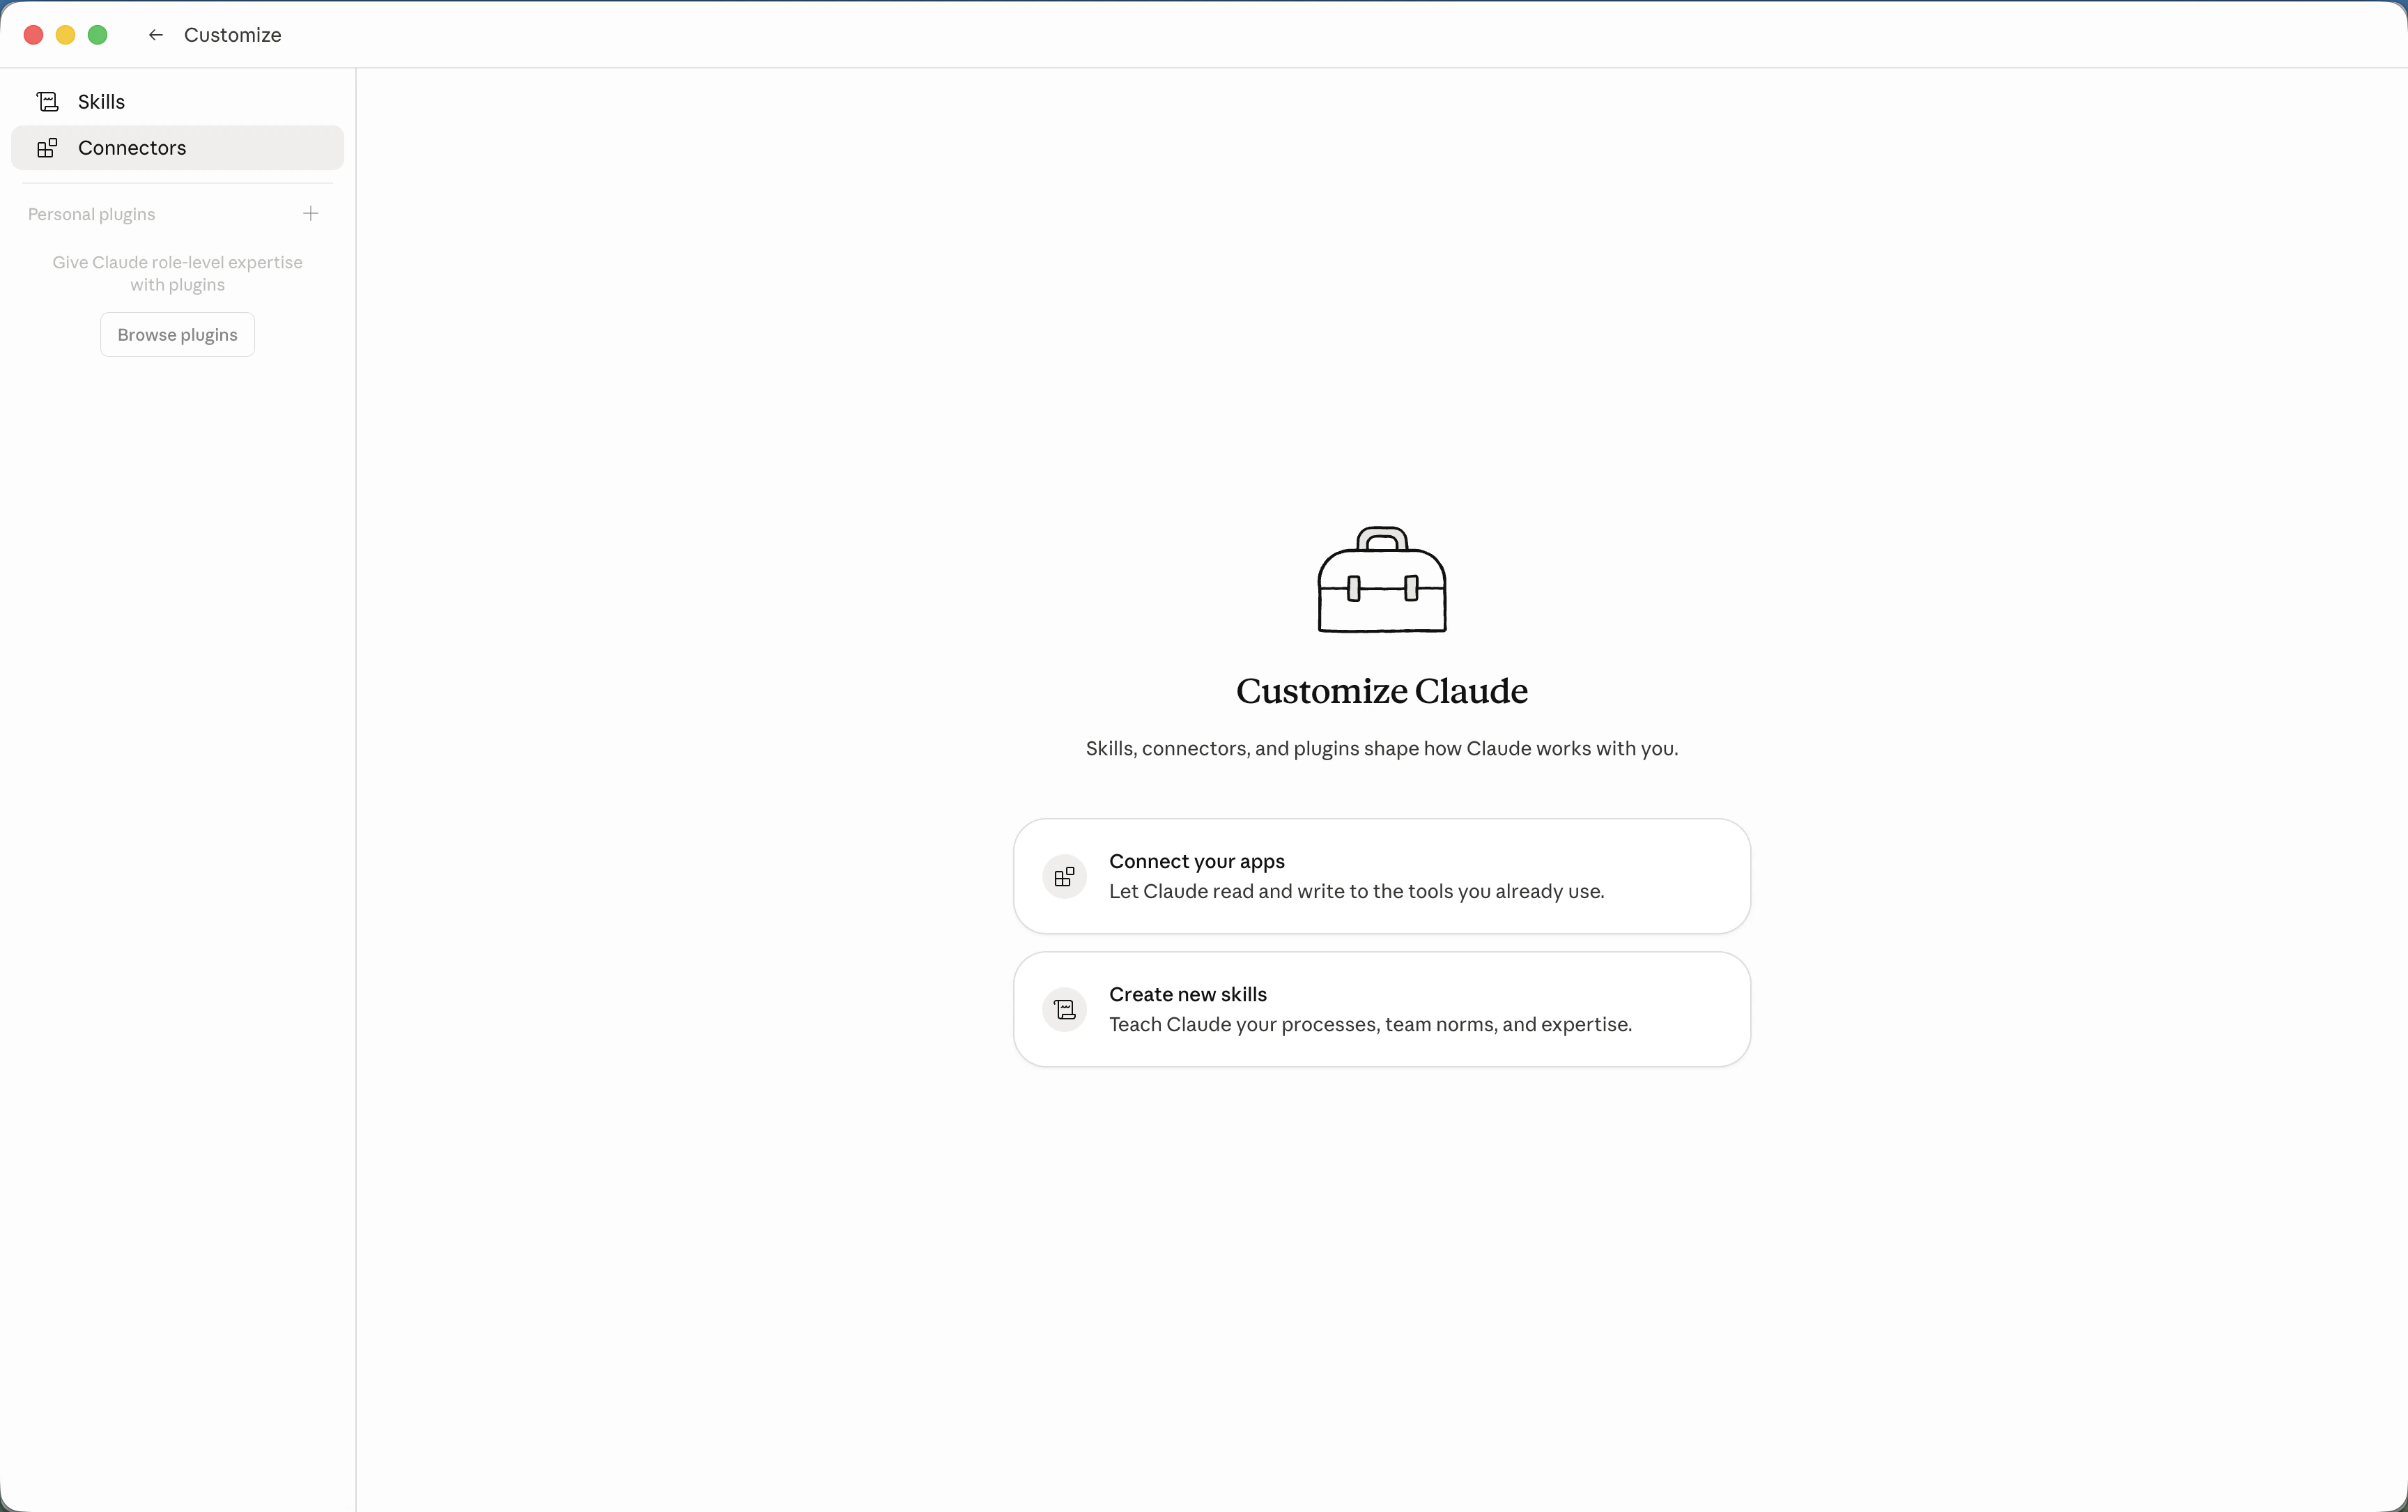
 Select **Connectors** from the Customize menu.
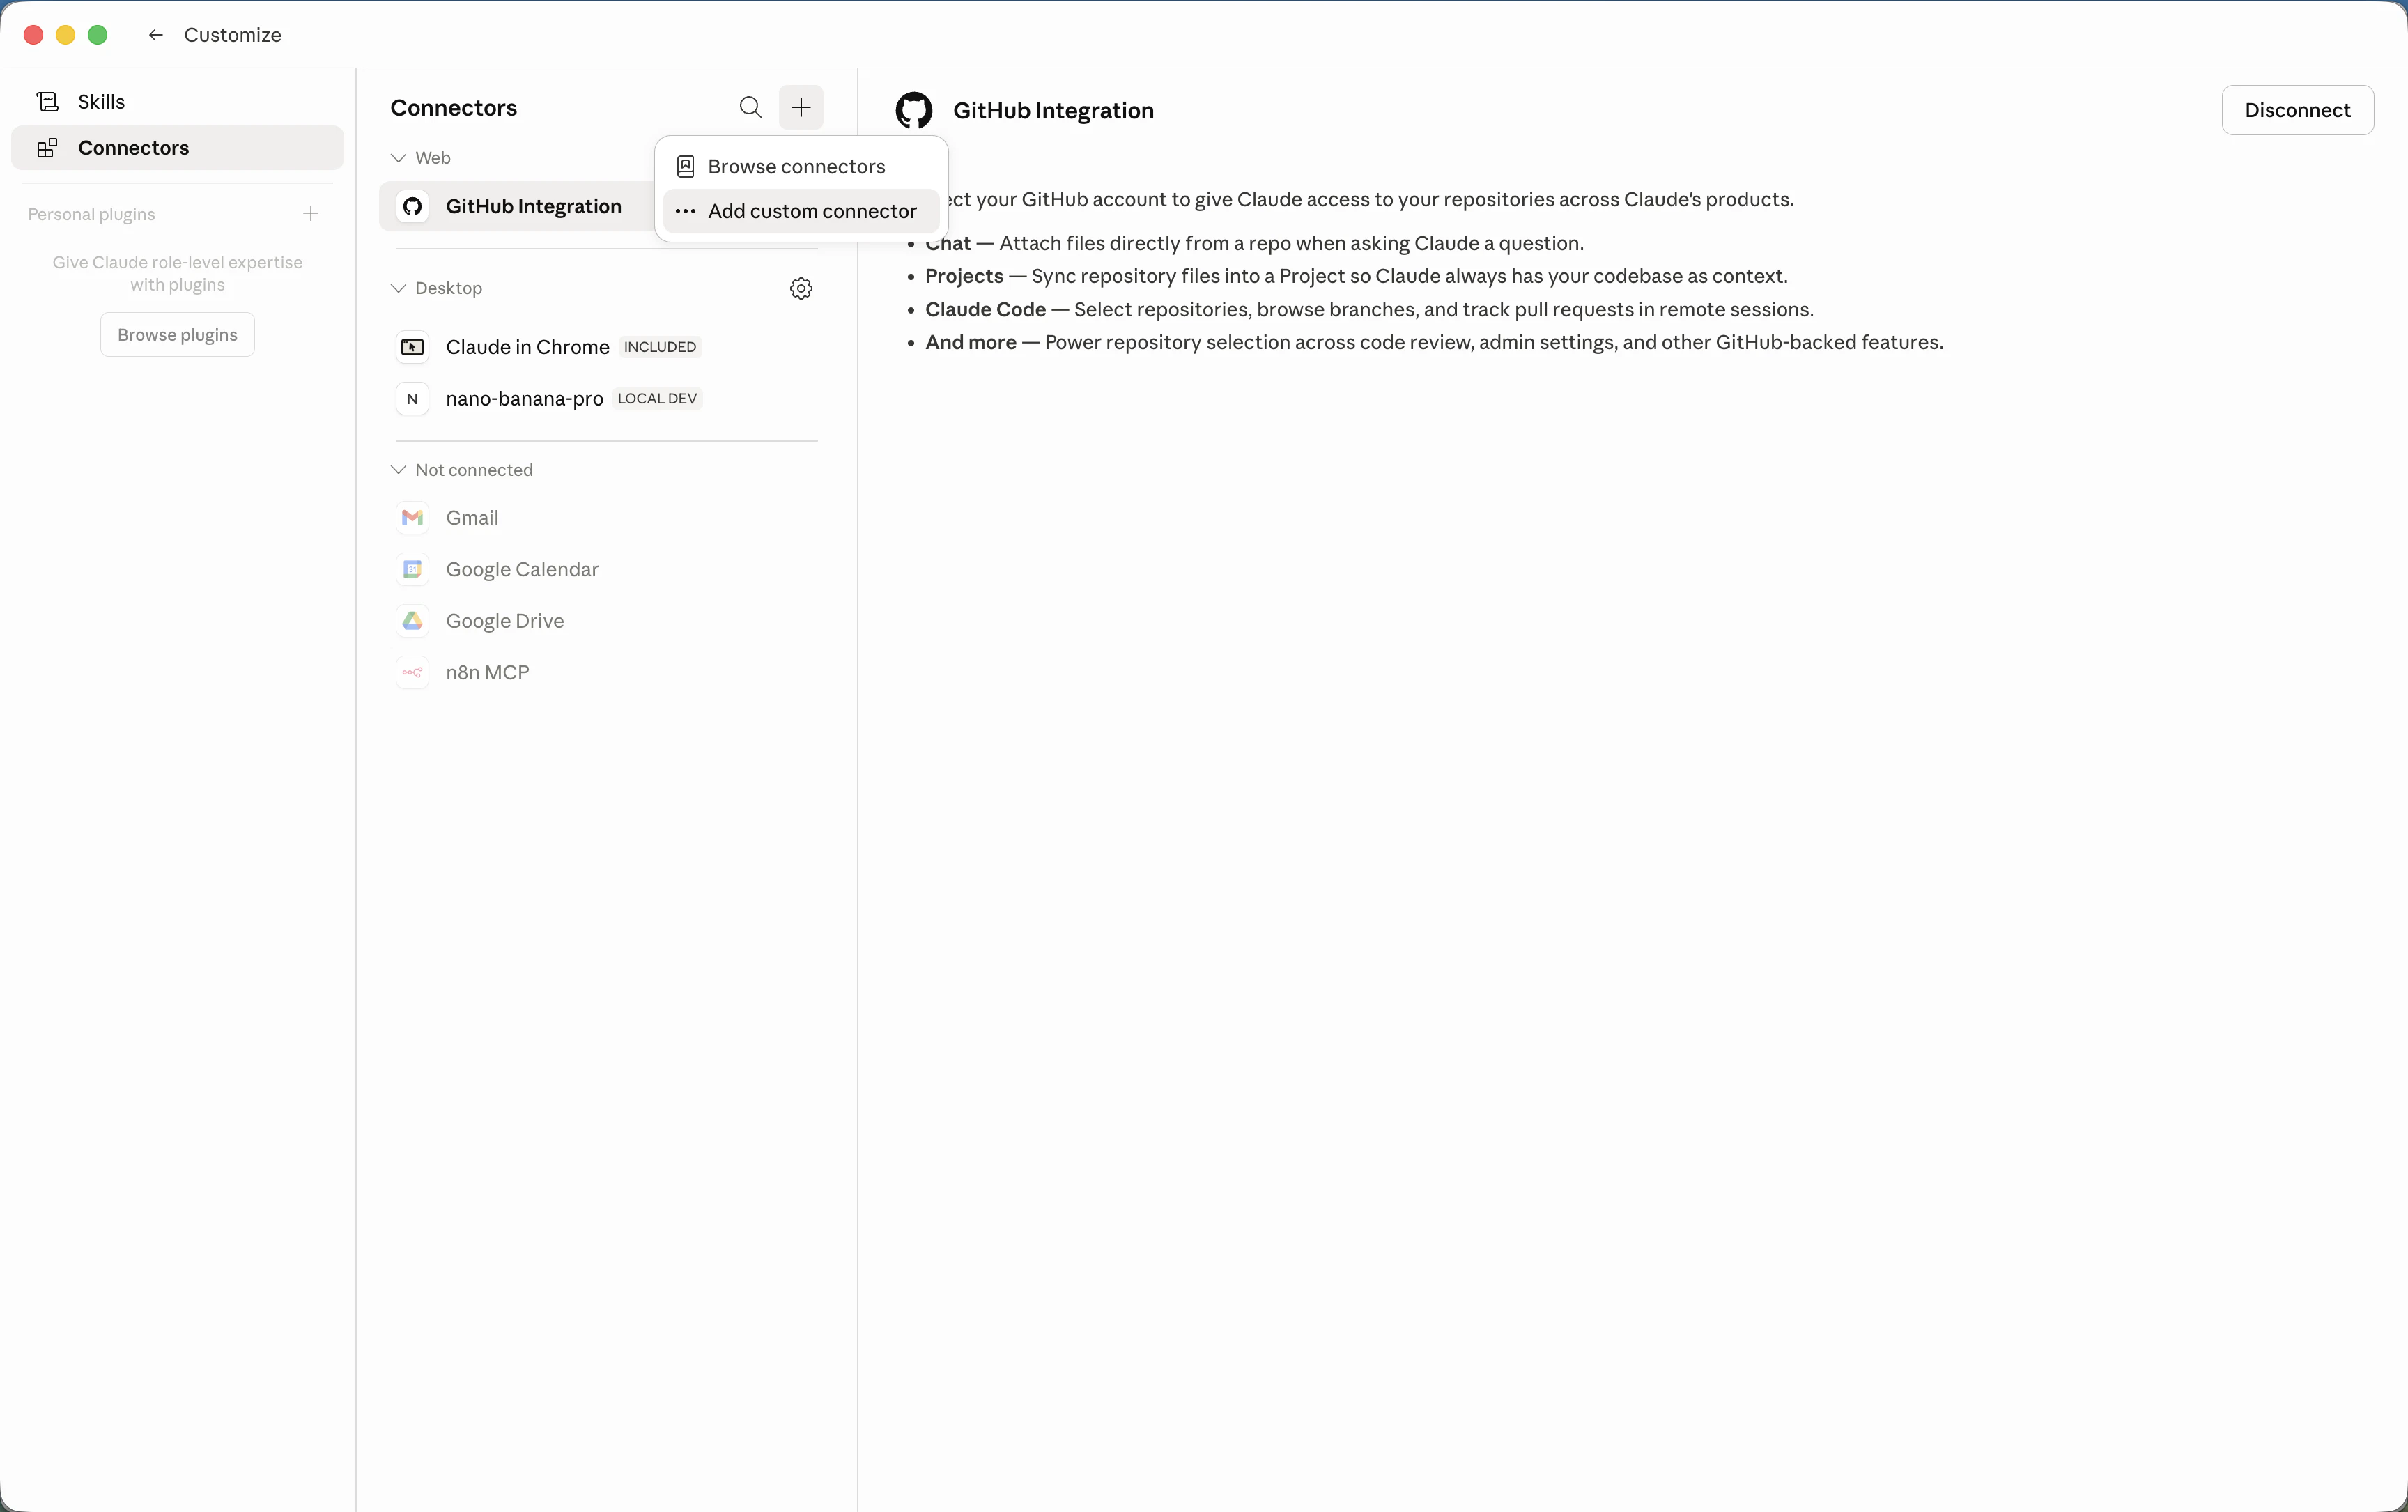
 Click the **+** icon and choose **Add custom connector**.
 Name it **AdAdvisor**, paste `https://api.adadvisor.ai/mcp`, and click **Add**.
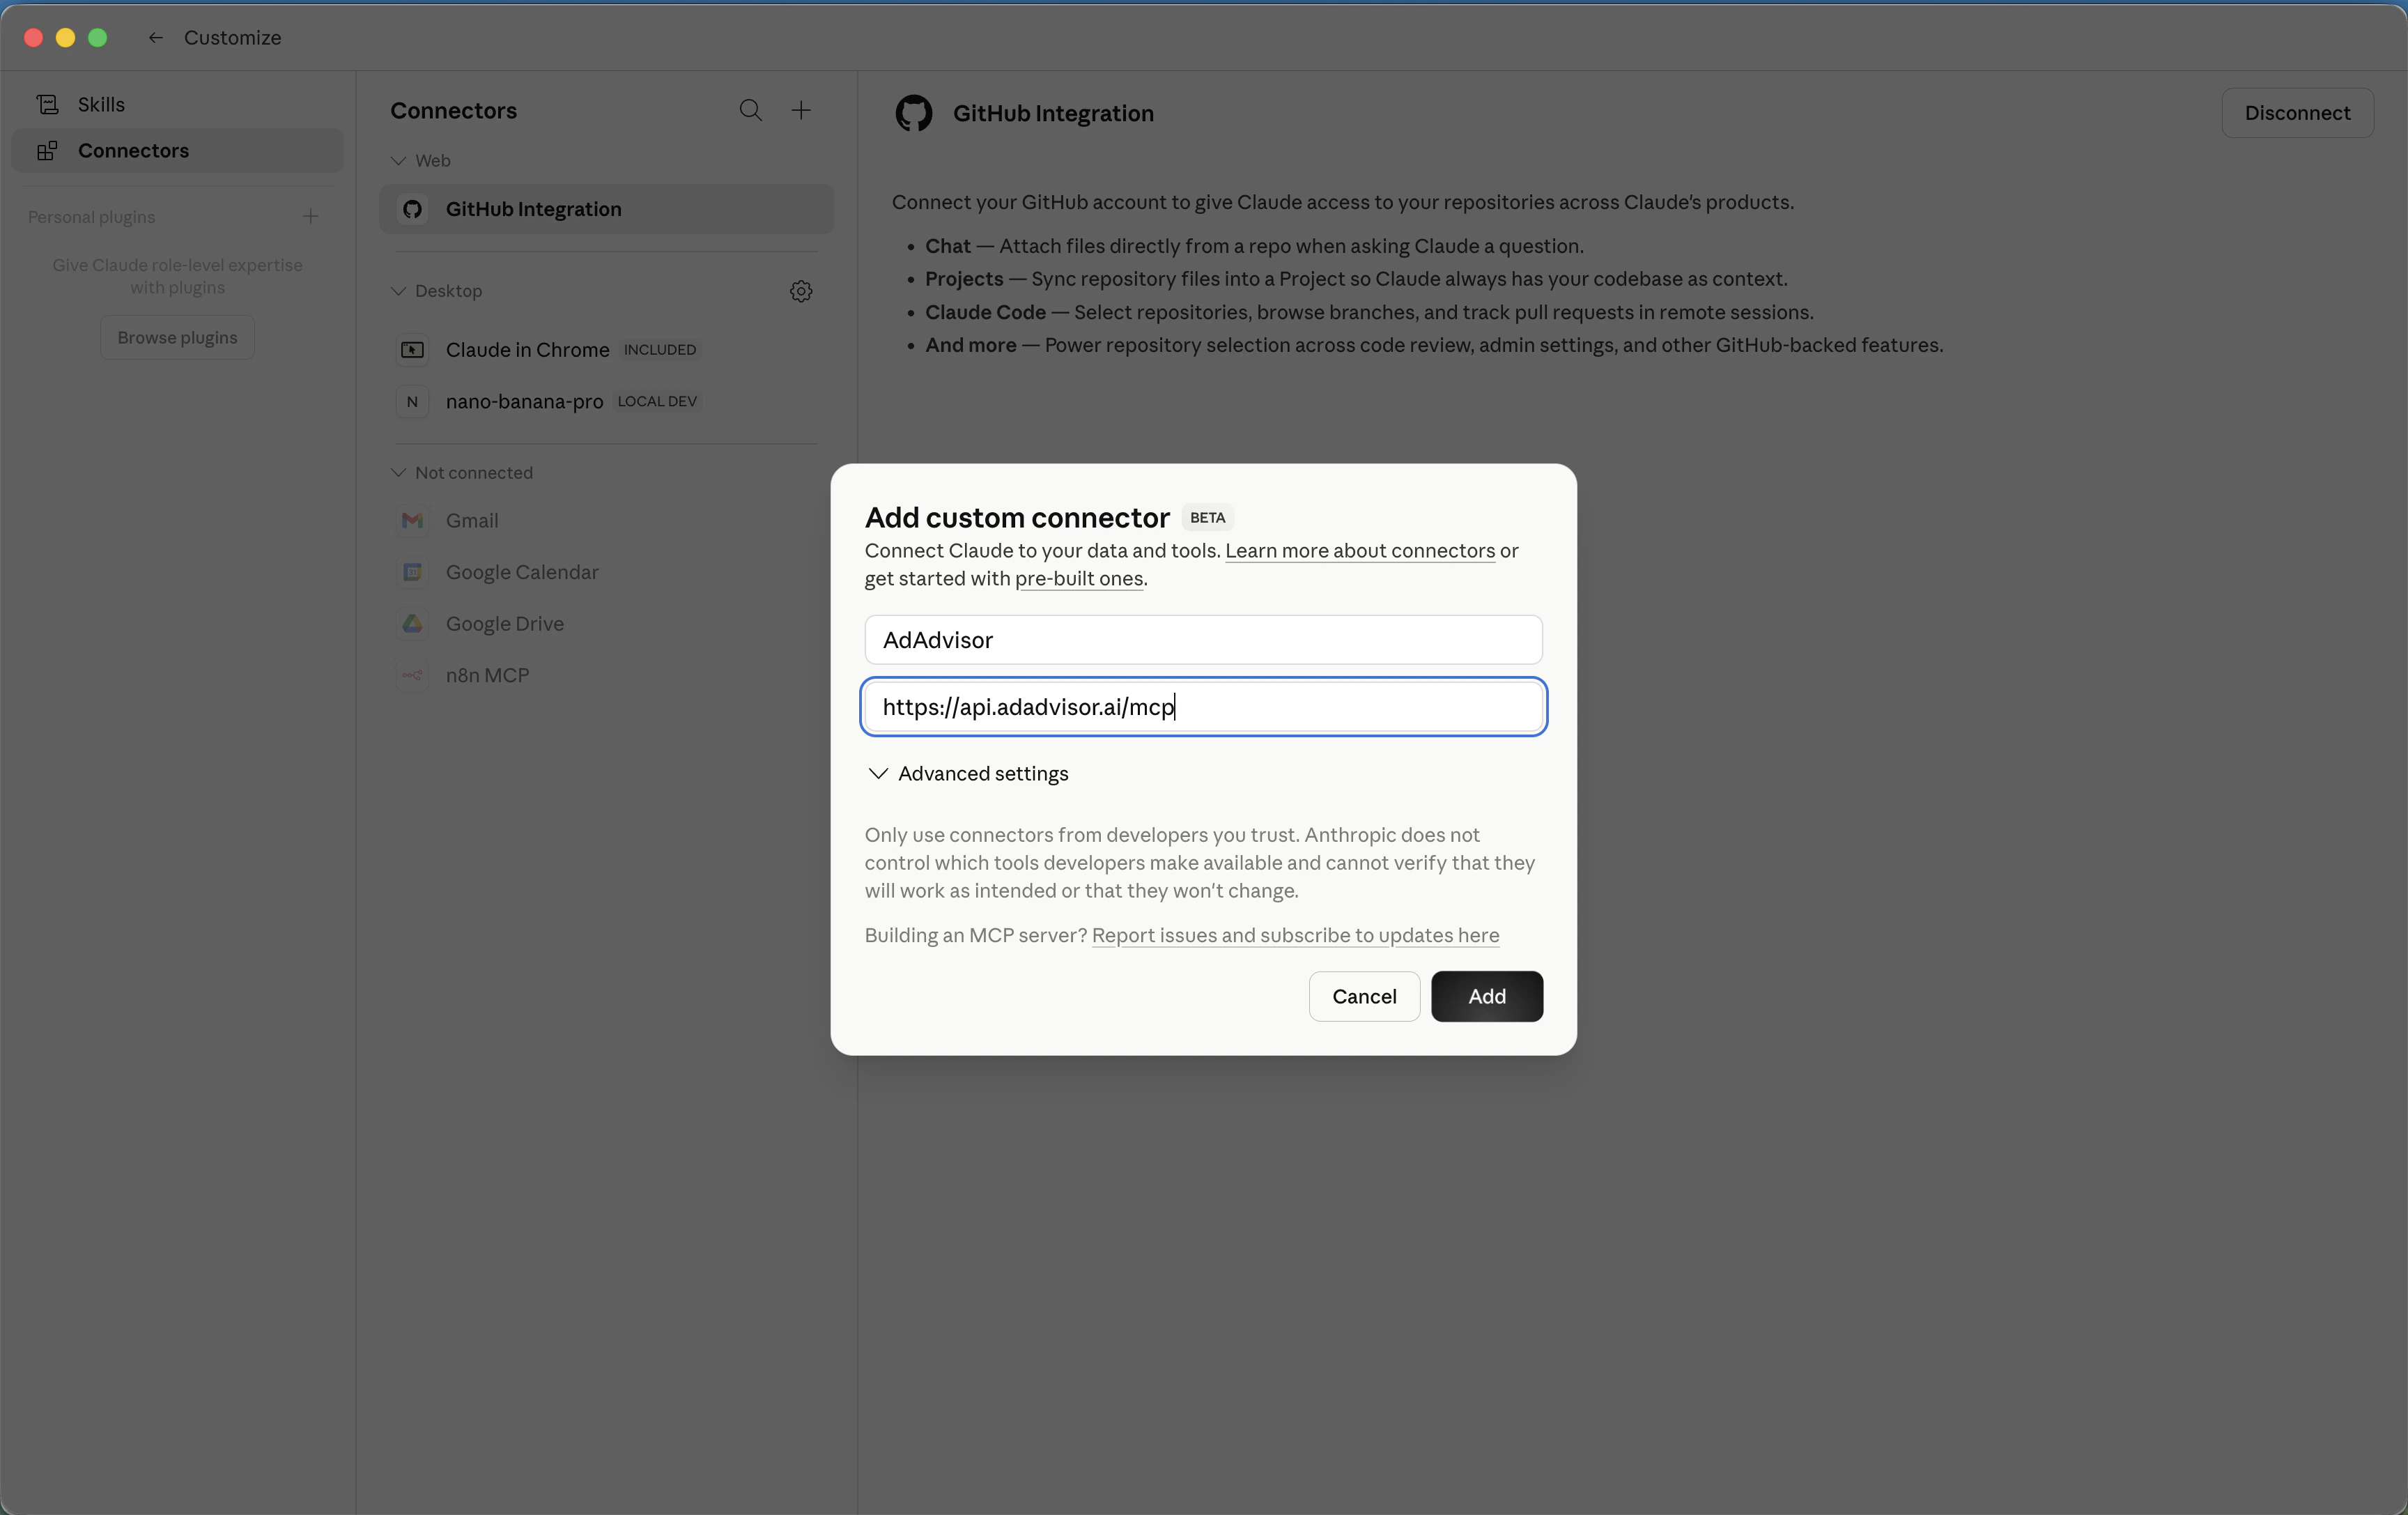 Click **Connect** on the AdAdvisor row to start authorization.
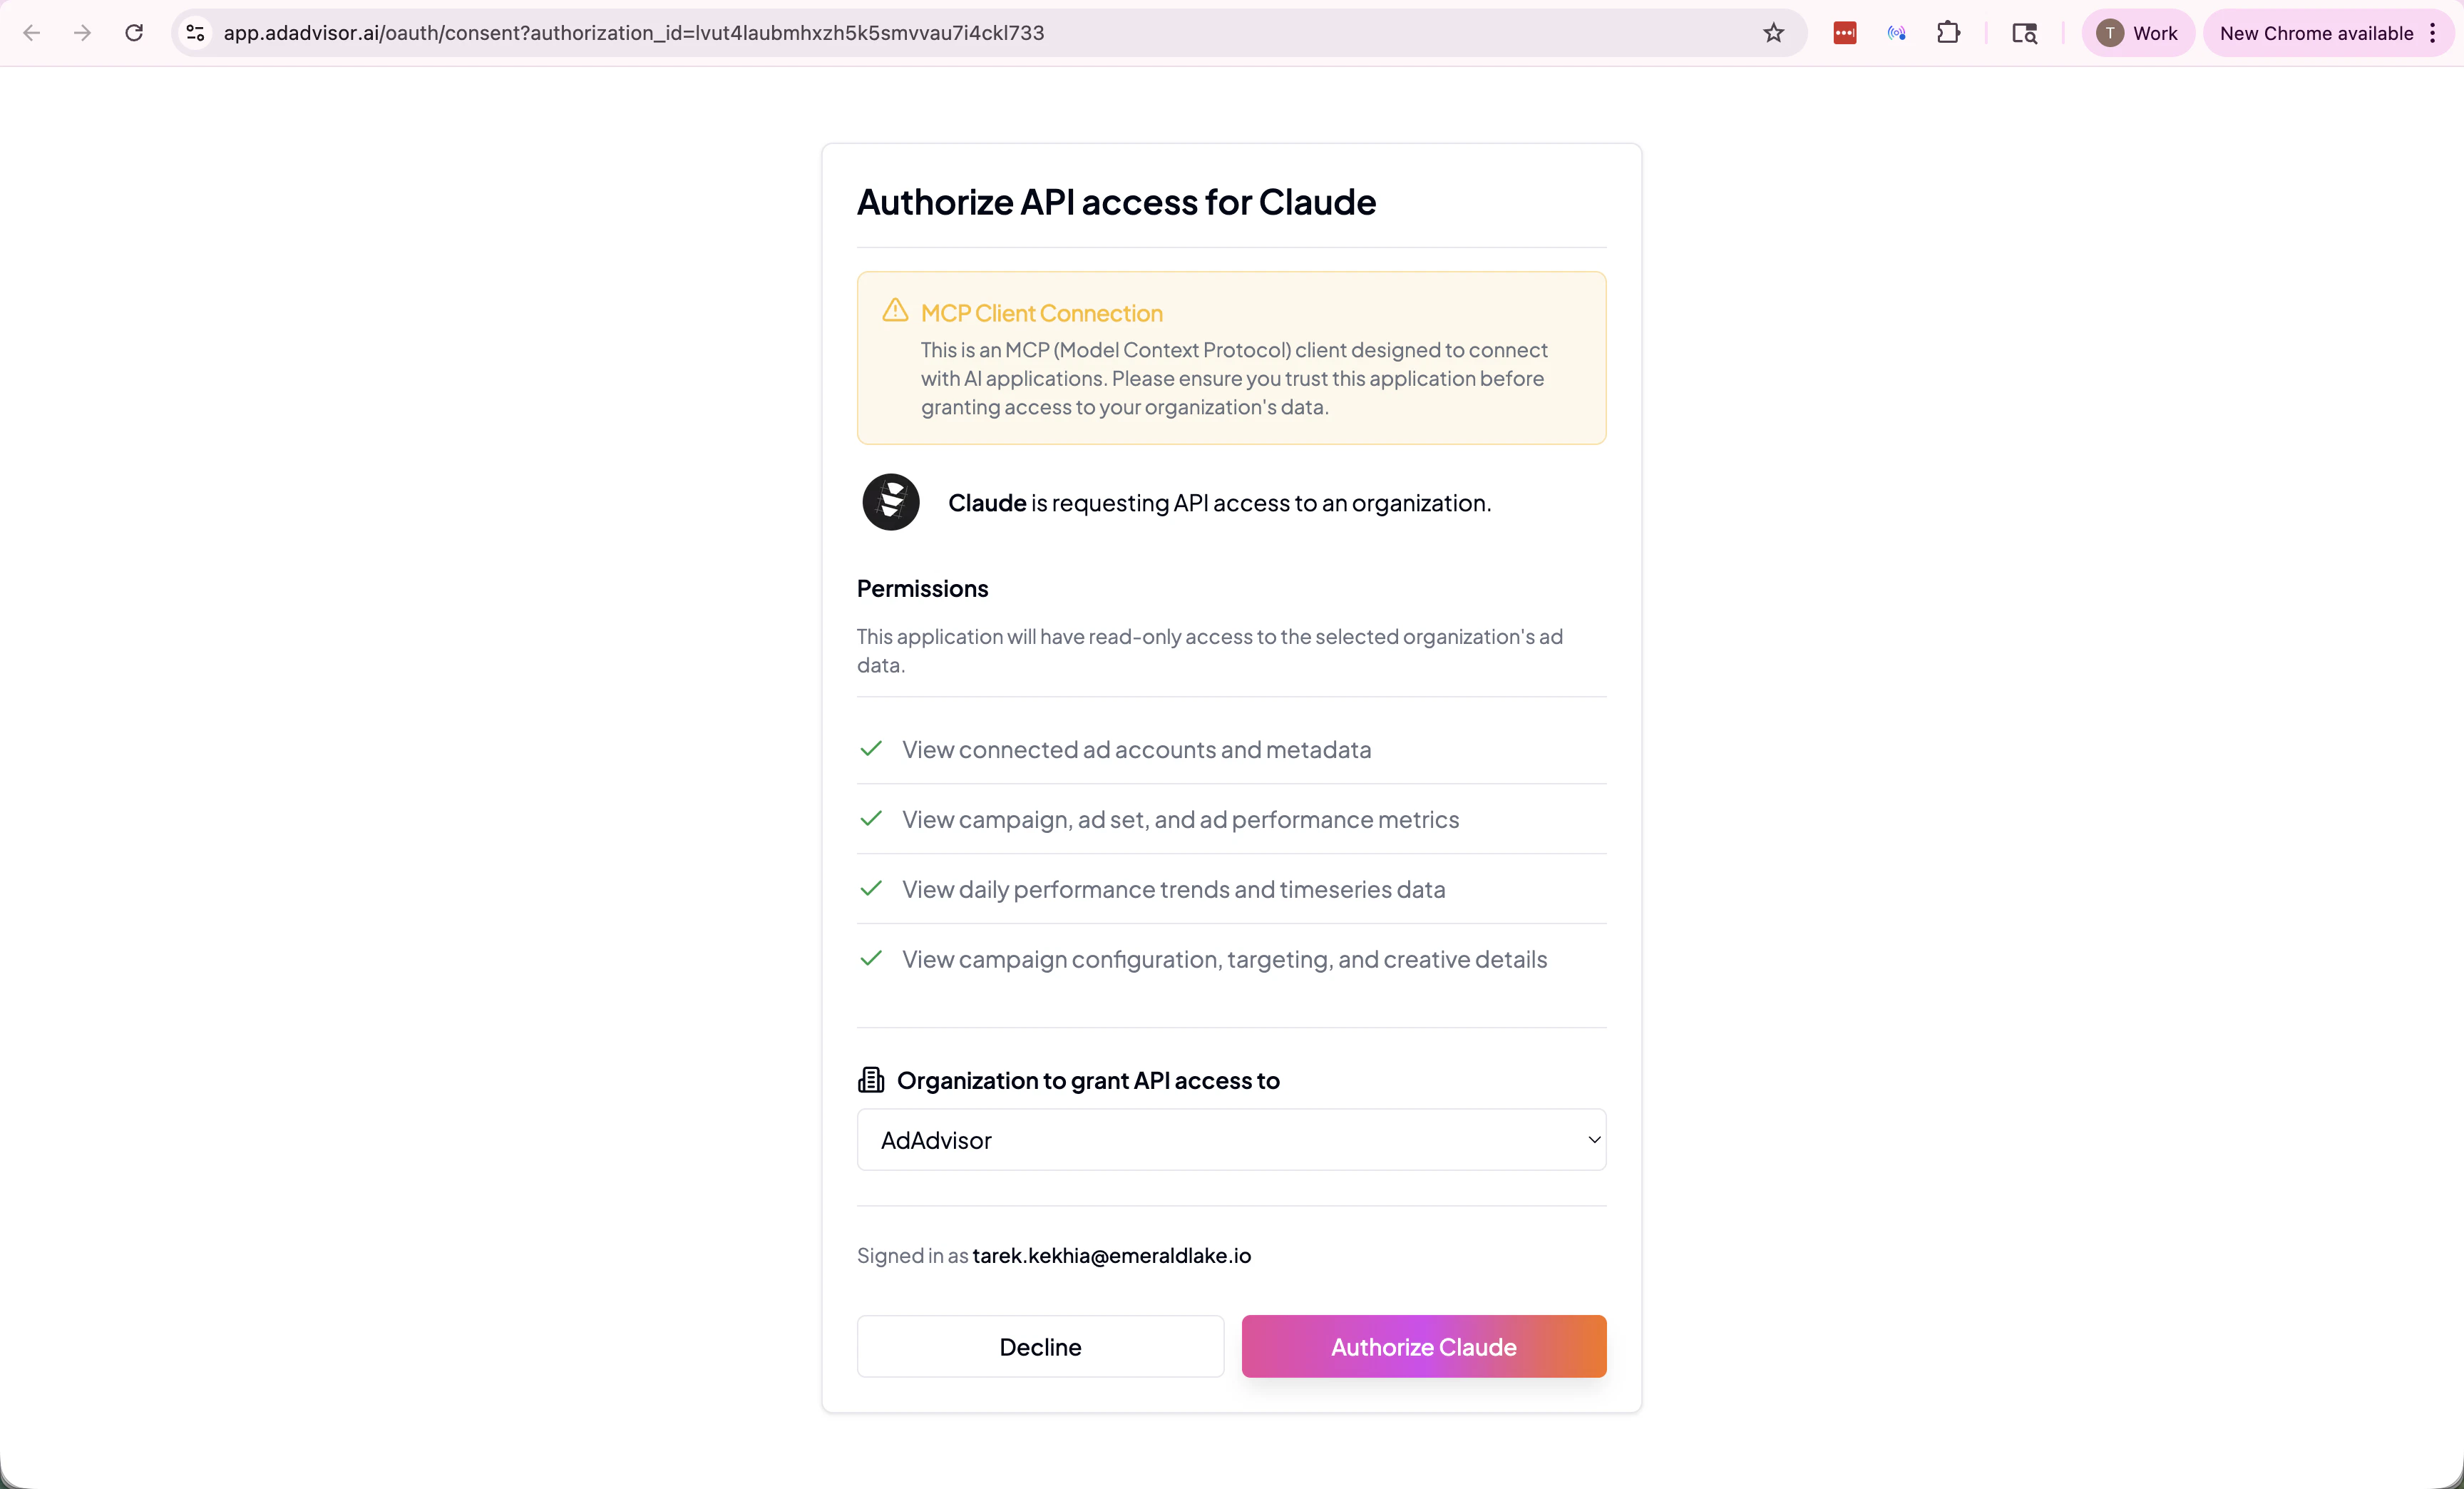
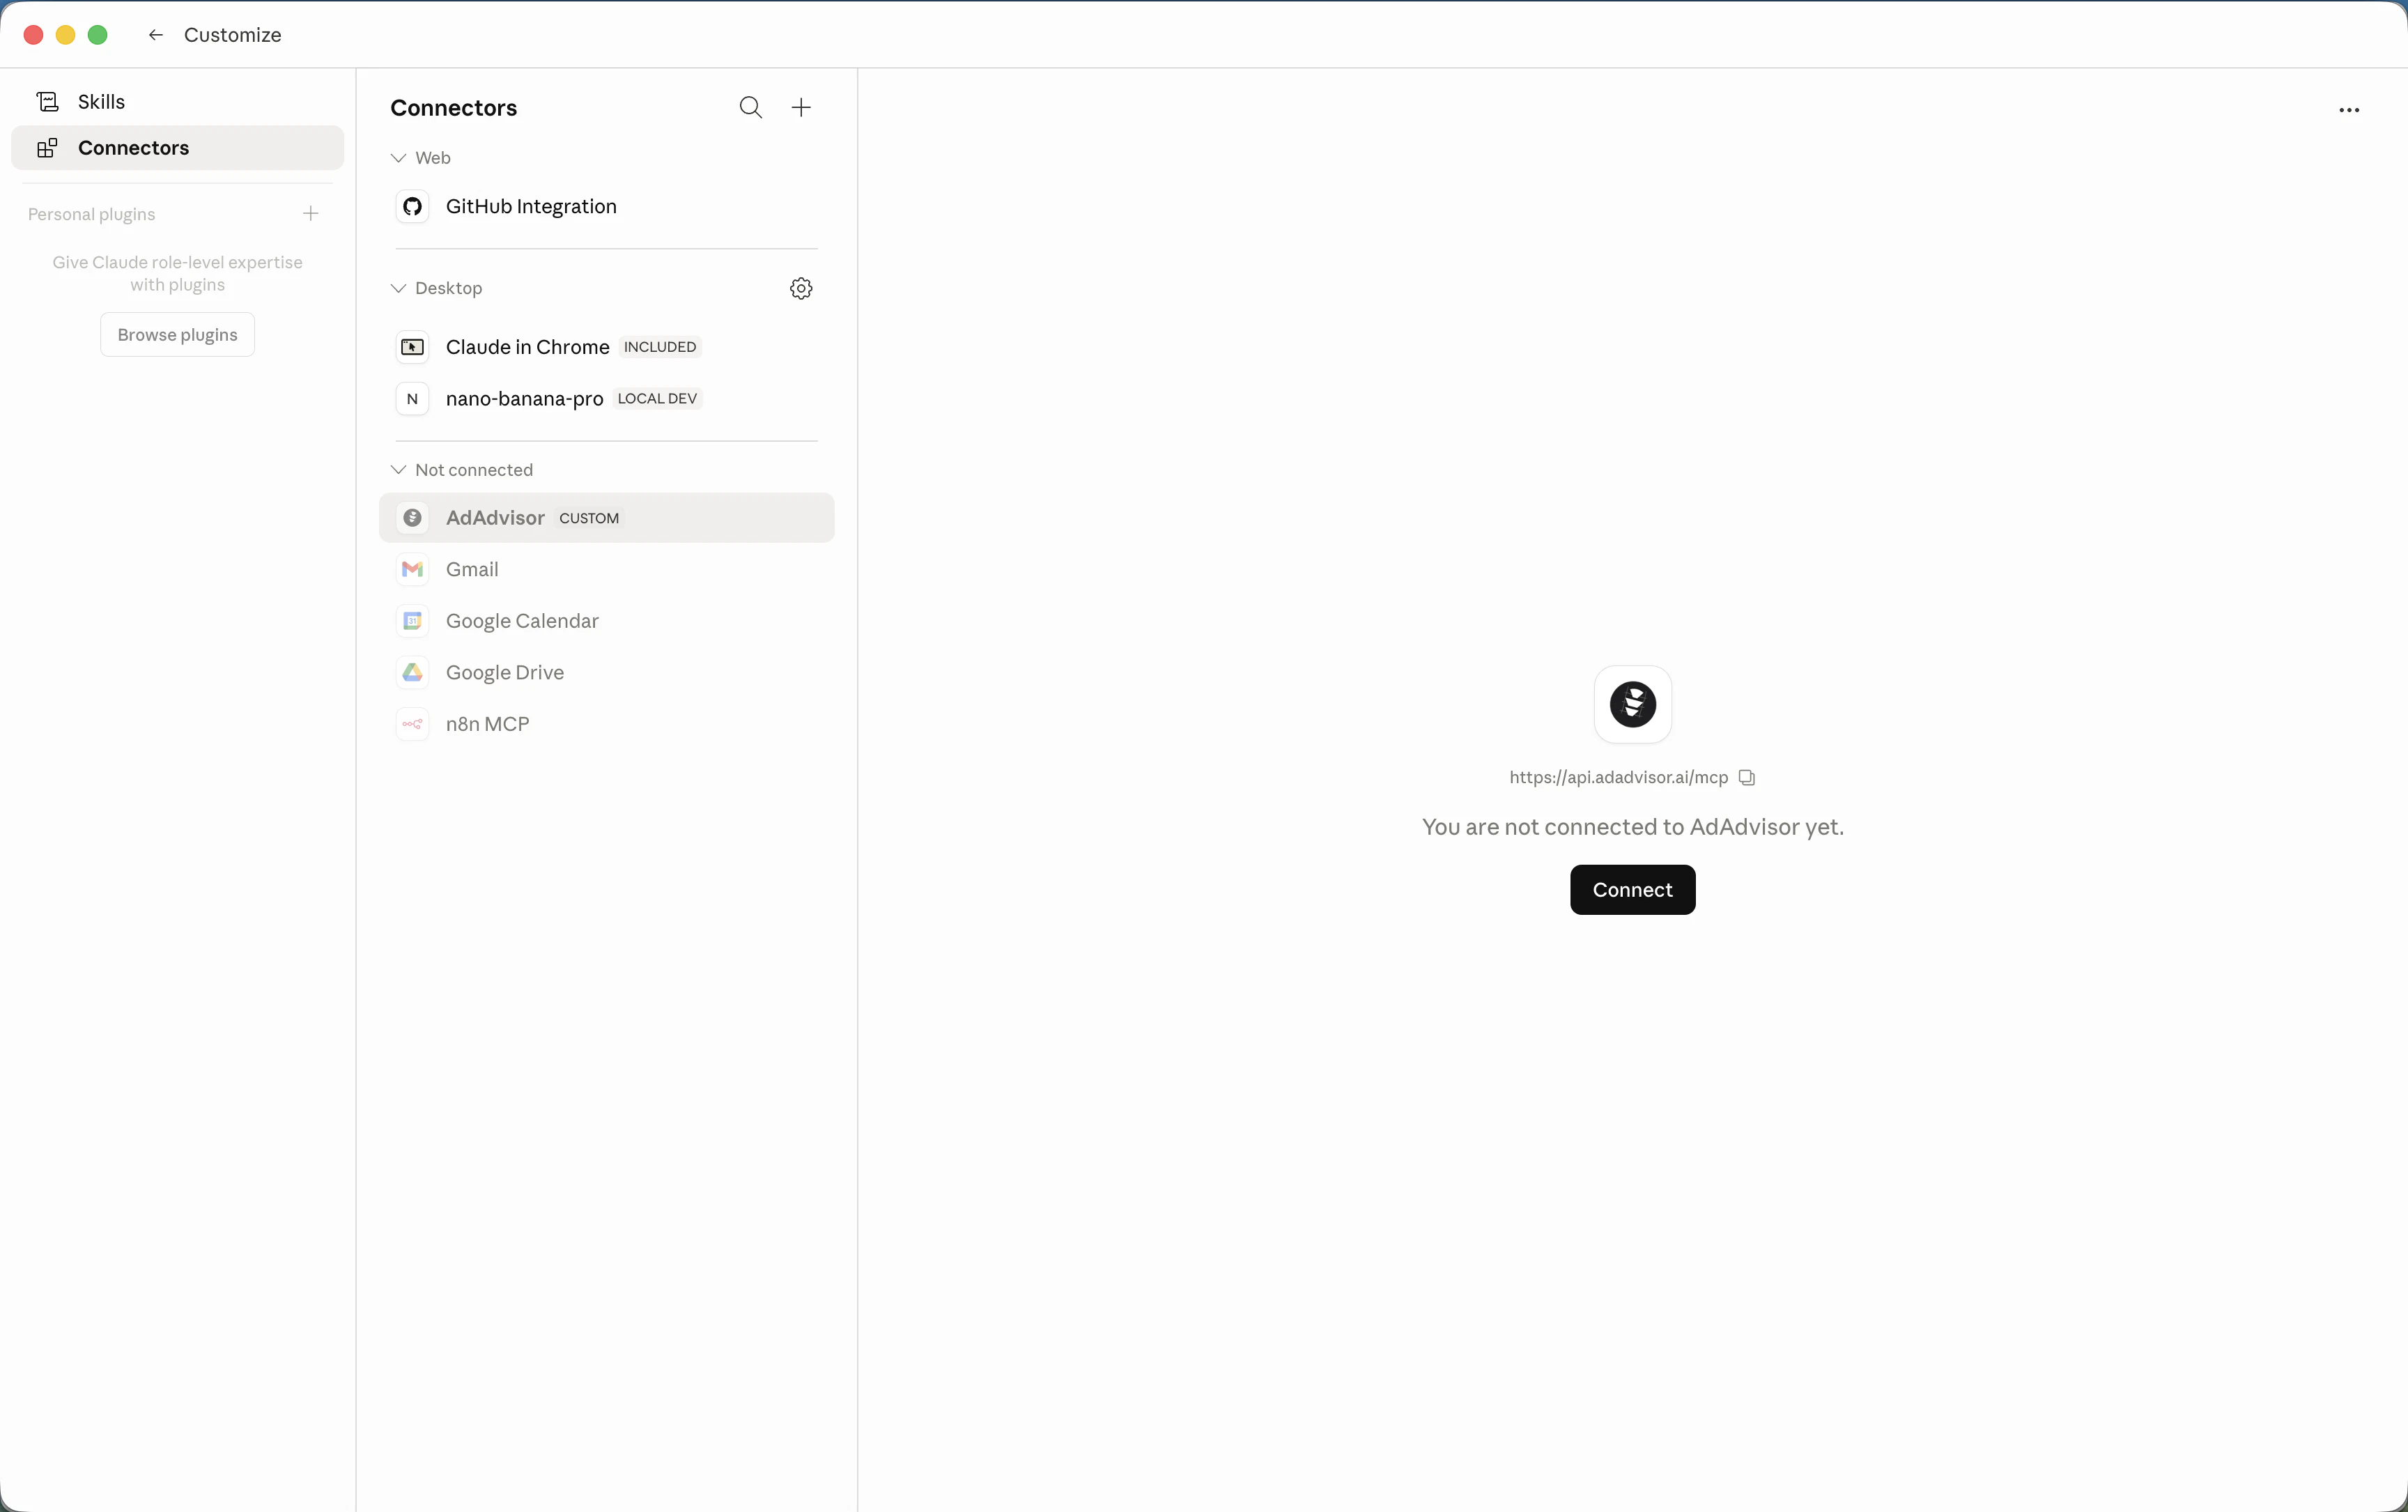 Sign in to AdAdvisor and click **Authorize Claude** to grant access.
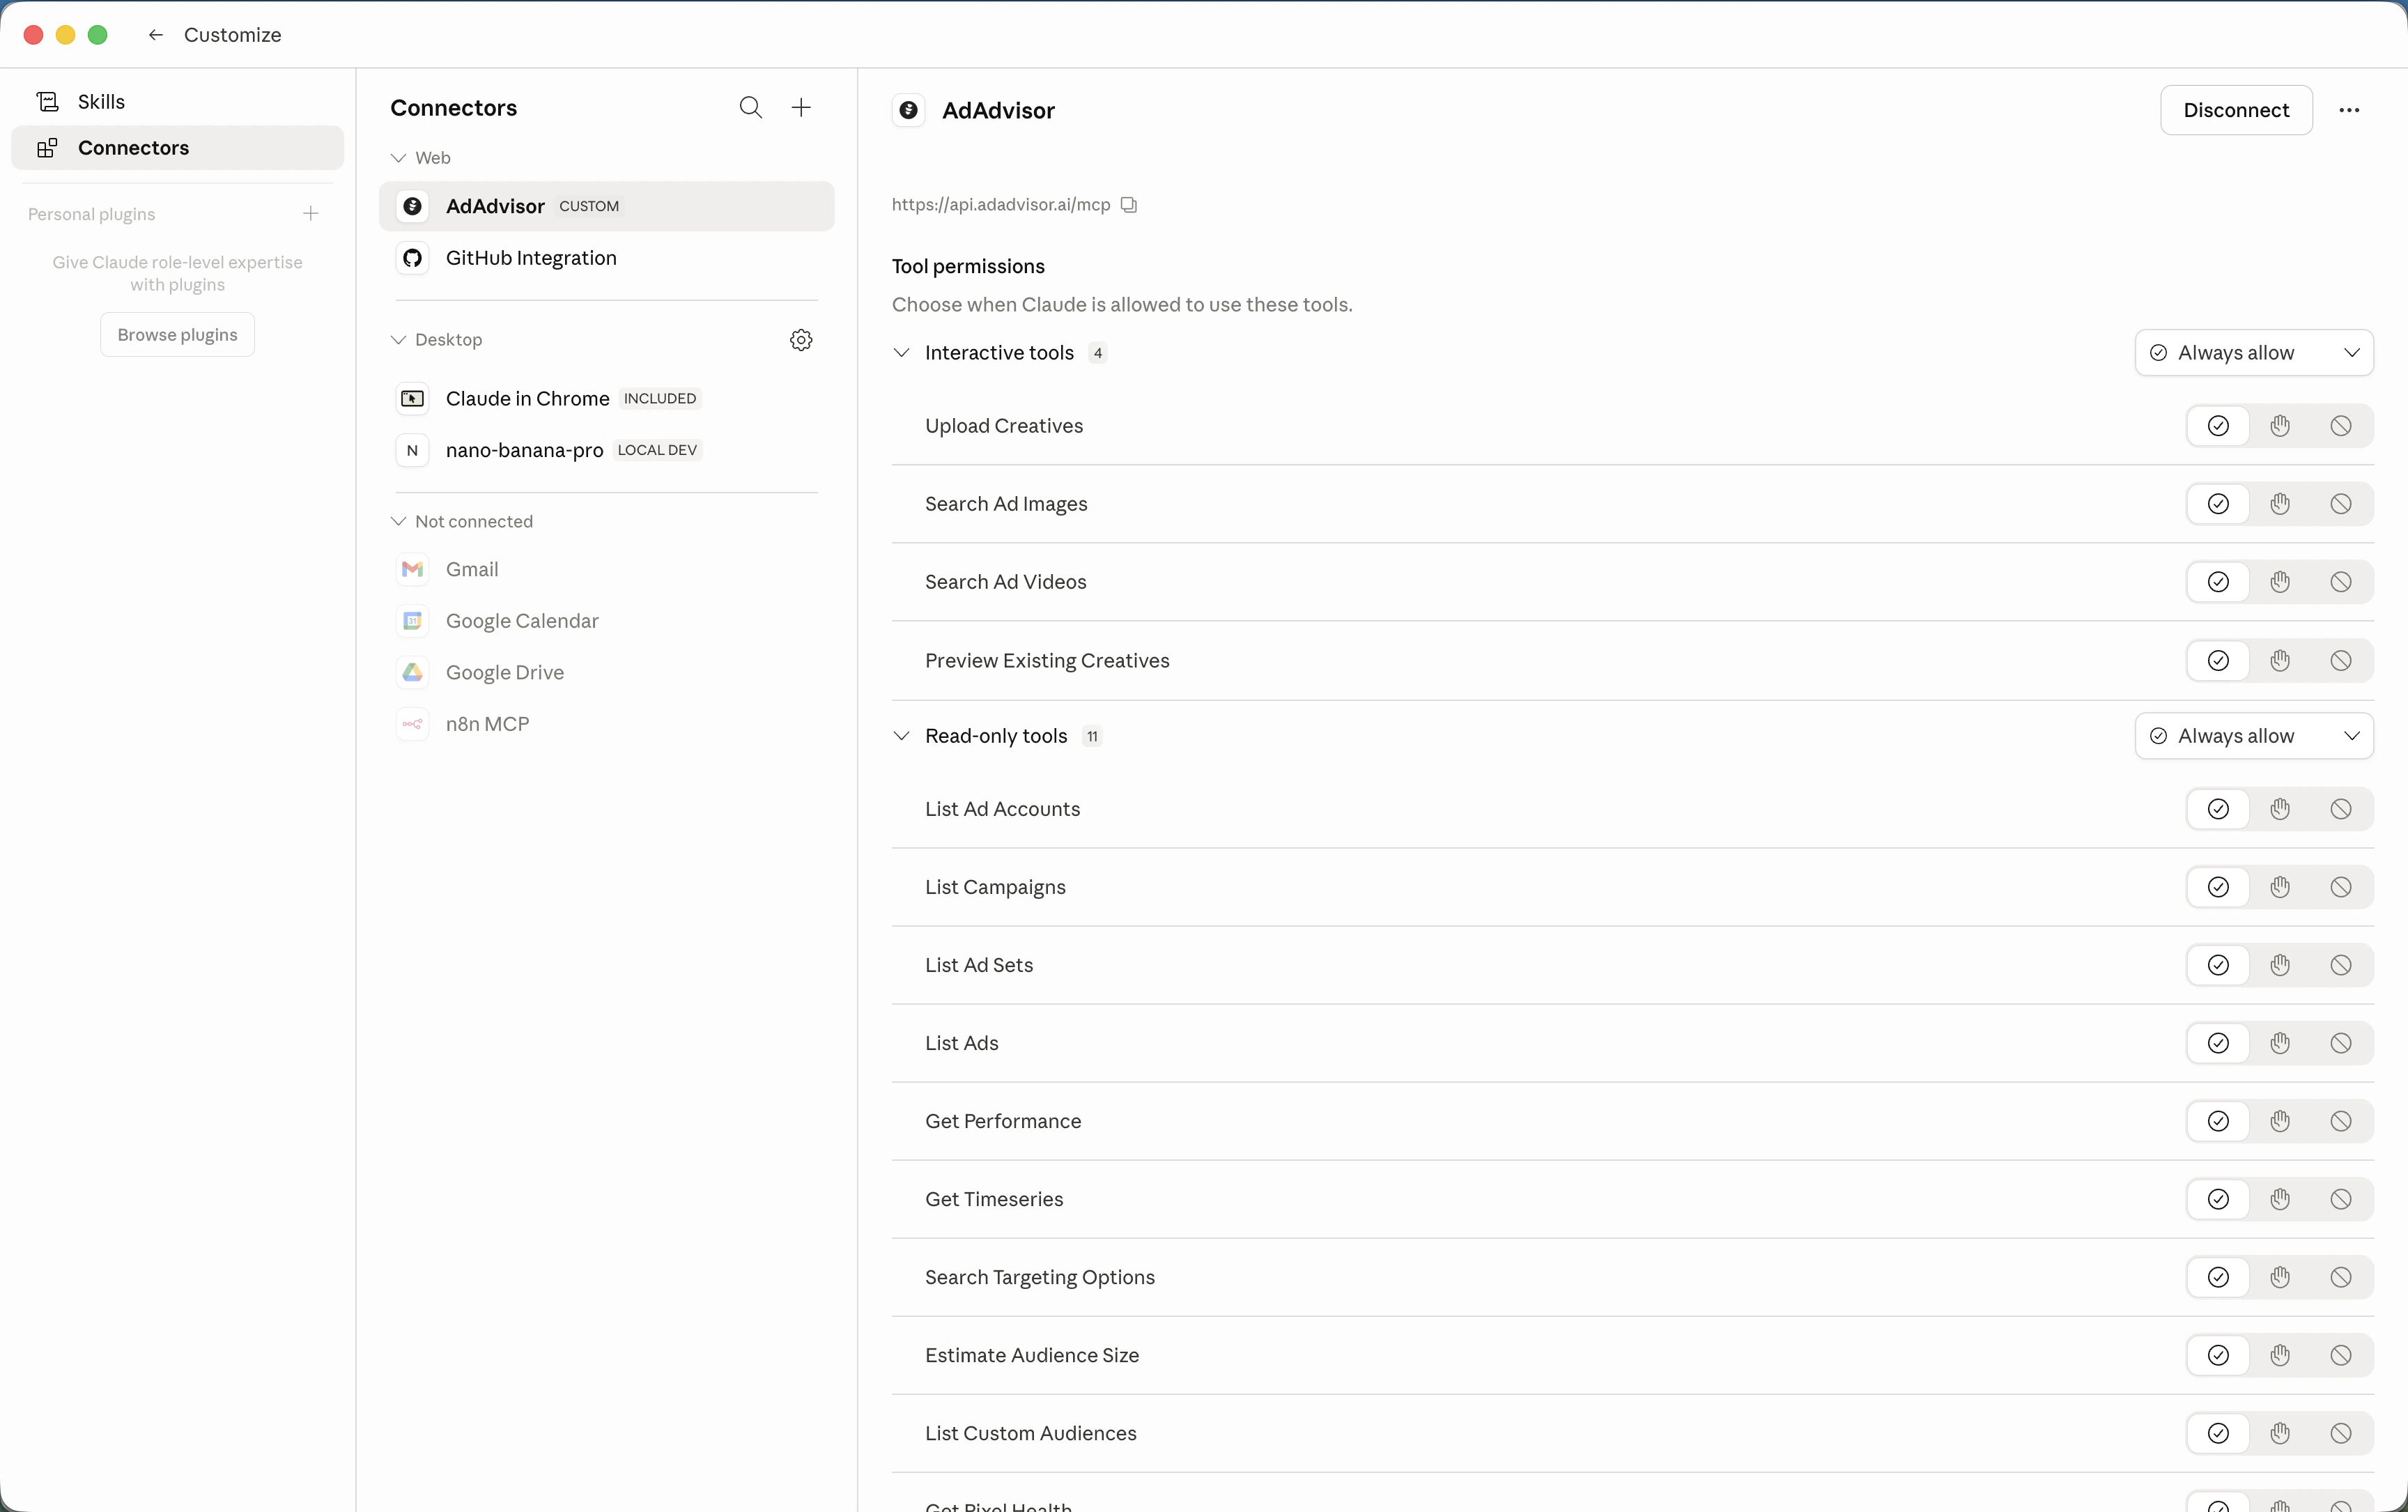
 Review the tool permissions and start chatting. AdAdvisor is connected.
 Connectors are available on Claude Pro, Max, Team, and Enterprise plans.
ChatGPT supports MCP servers through its Apps & Connectors settings.
Open ChatGPT, click your avatar, and choose **Settings**.
Connectors are available on Claude Pro, Max, Team, and Enterprise plans.
ChatGPT supports MCP servers through its Apps & Connectors settings.
Open ChatGPT, click your avatar, and choose **Settings**.
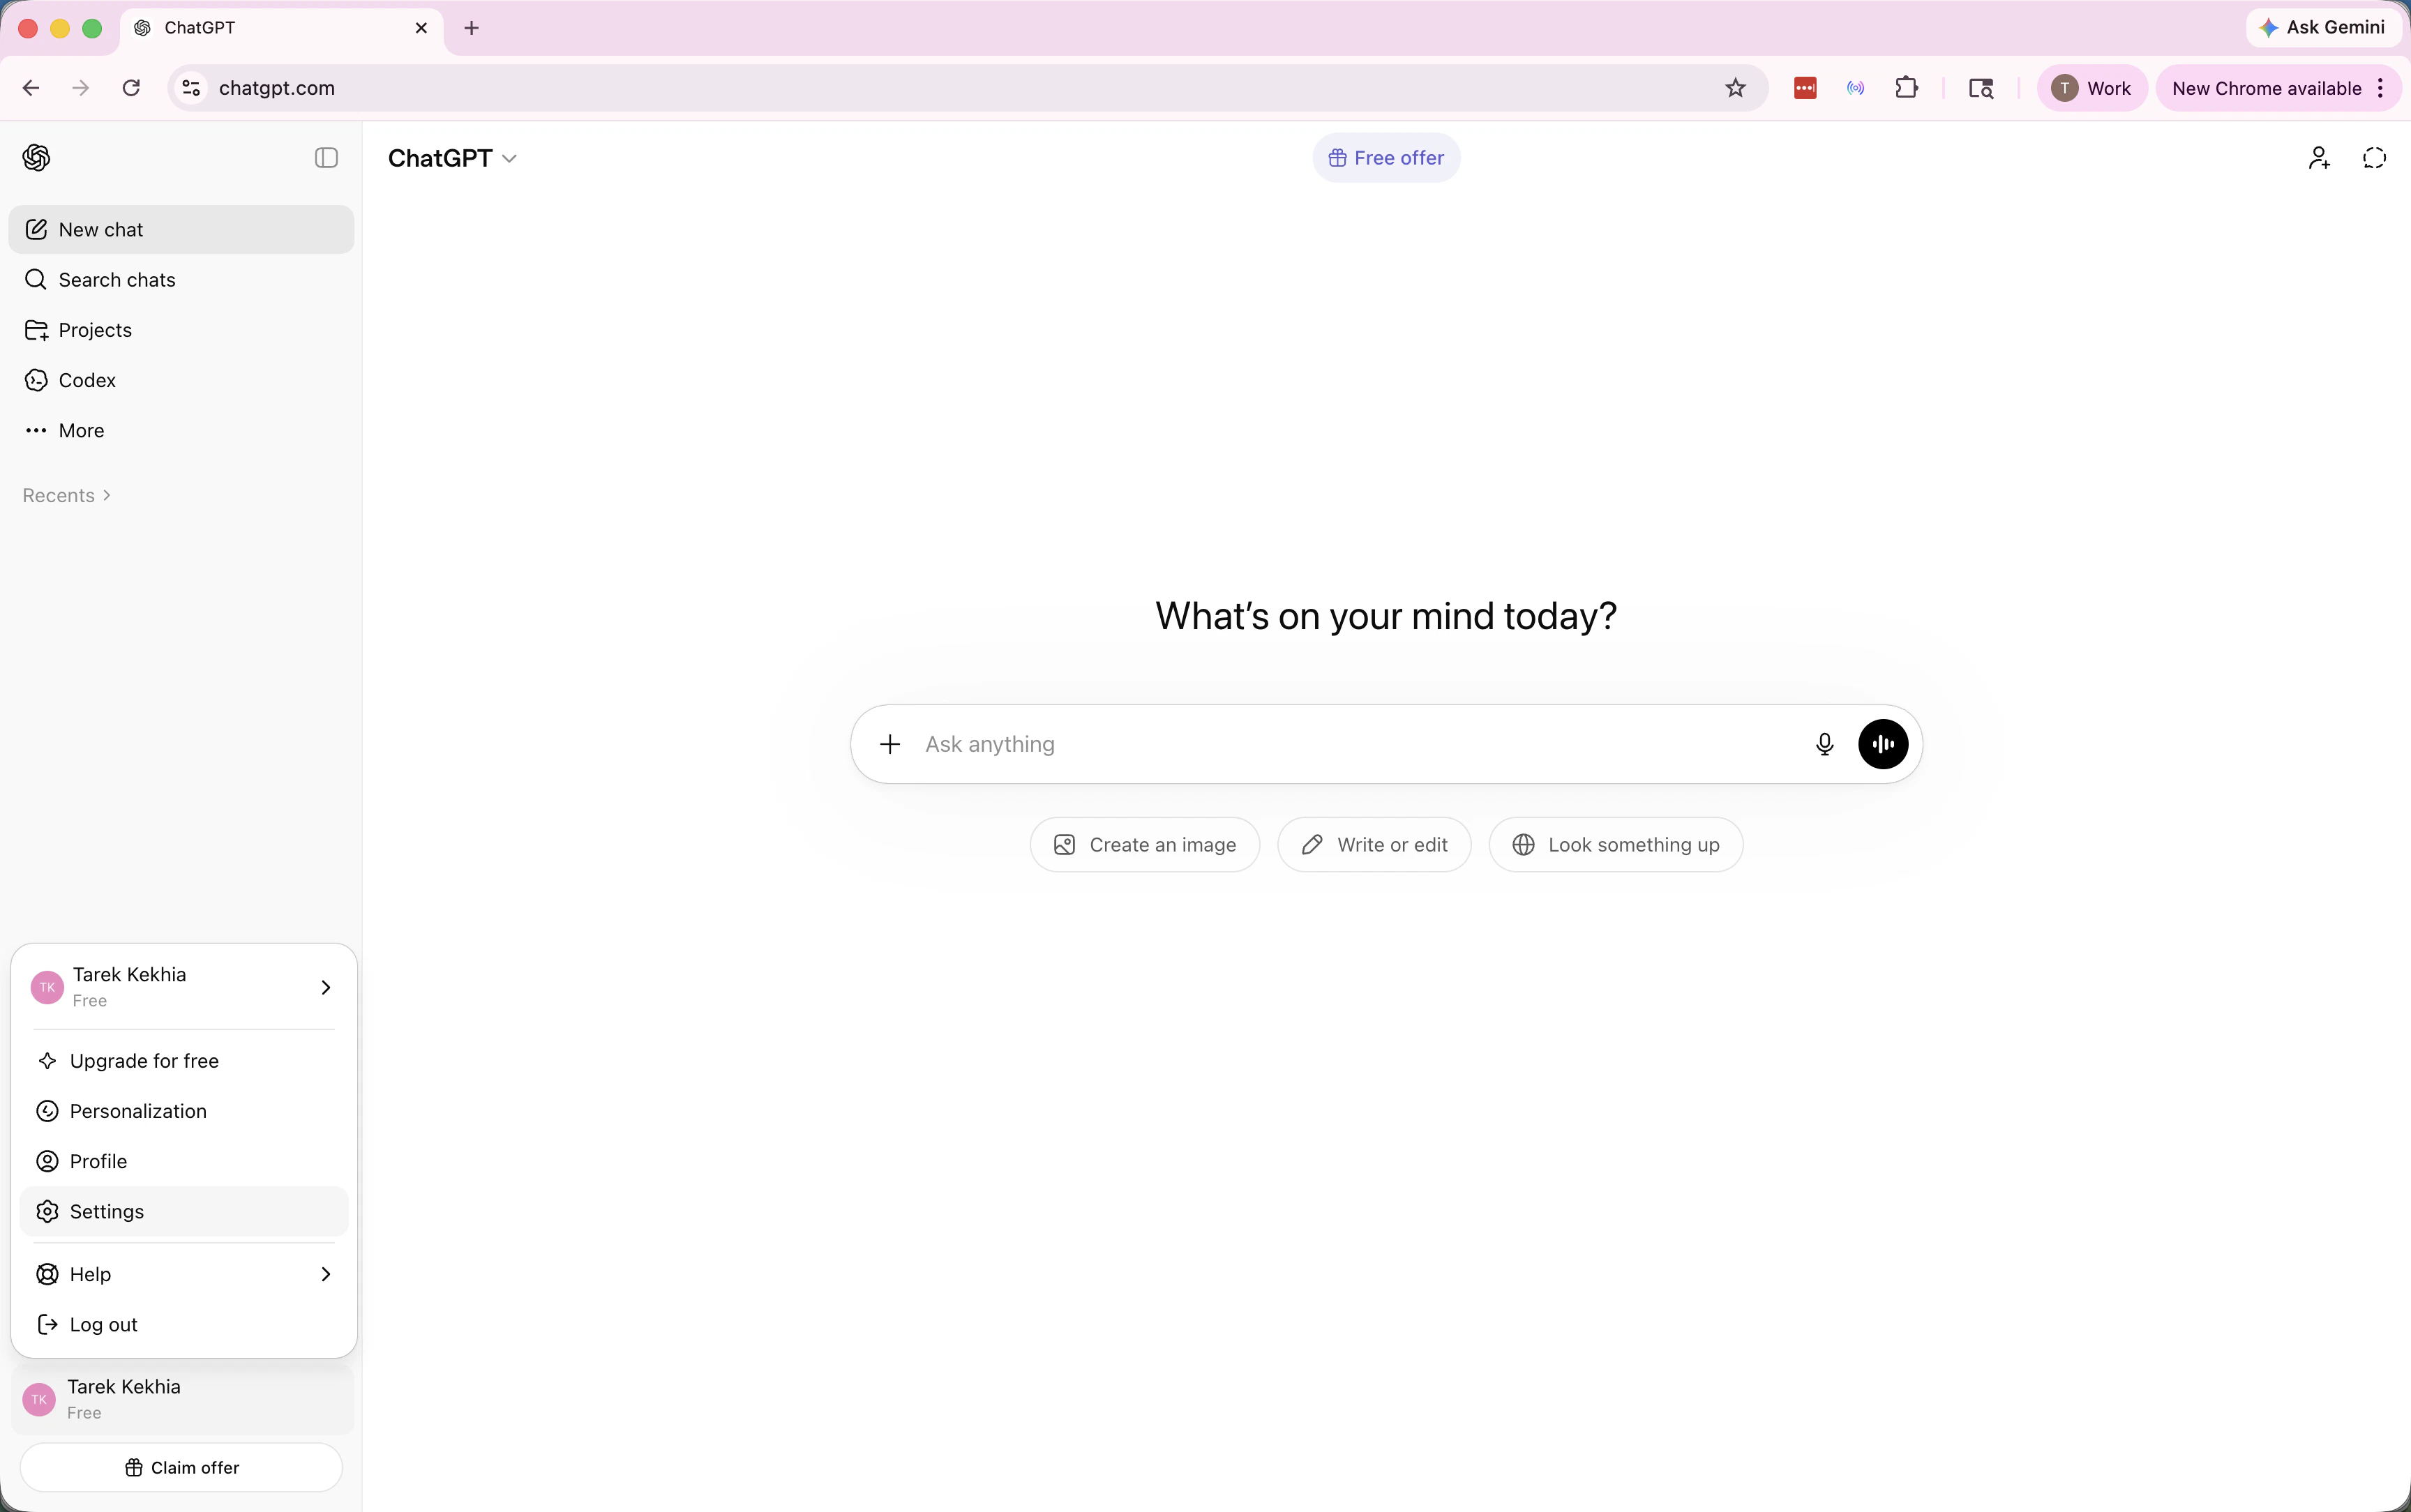 Open the **Apps & Connectors** tab and click **Advanced settings**.
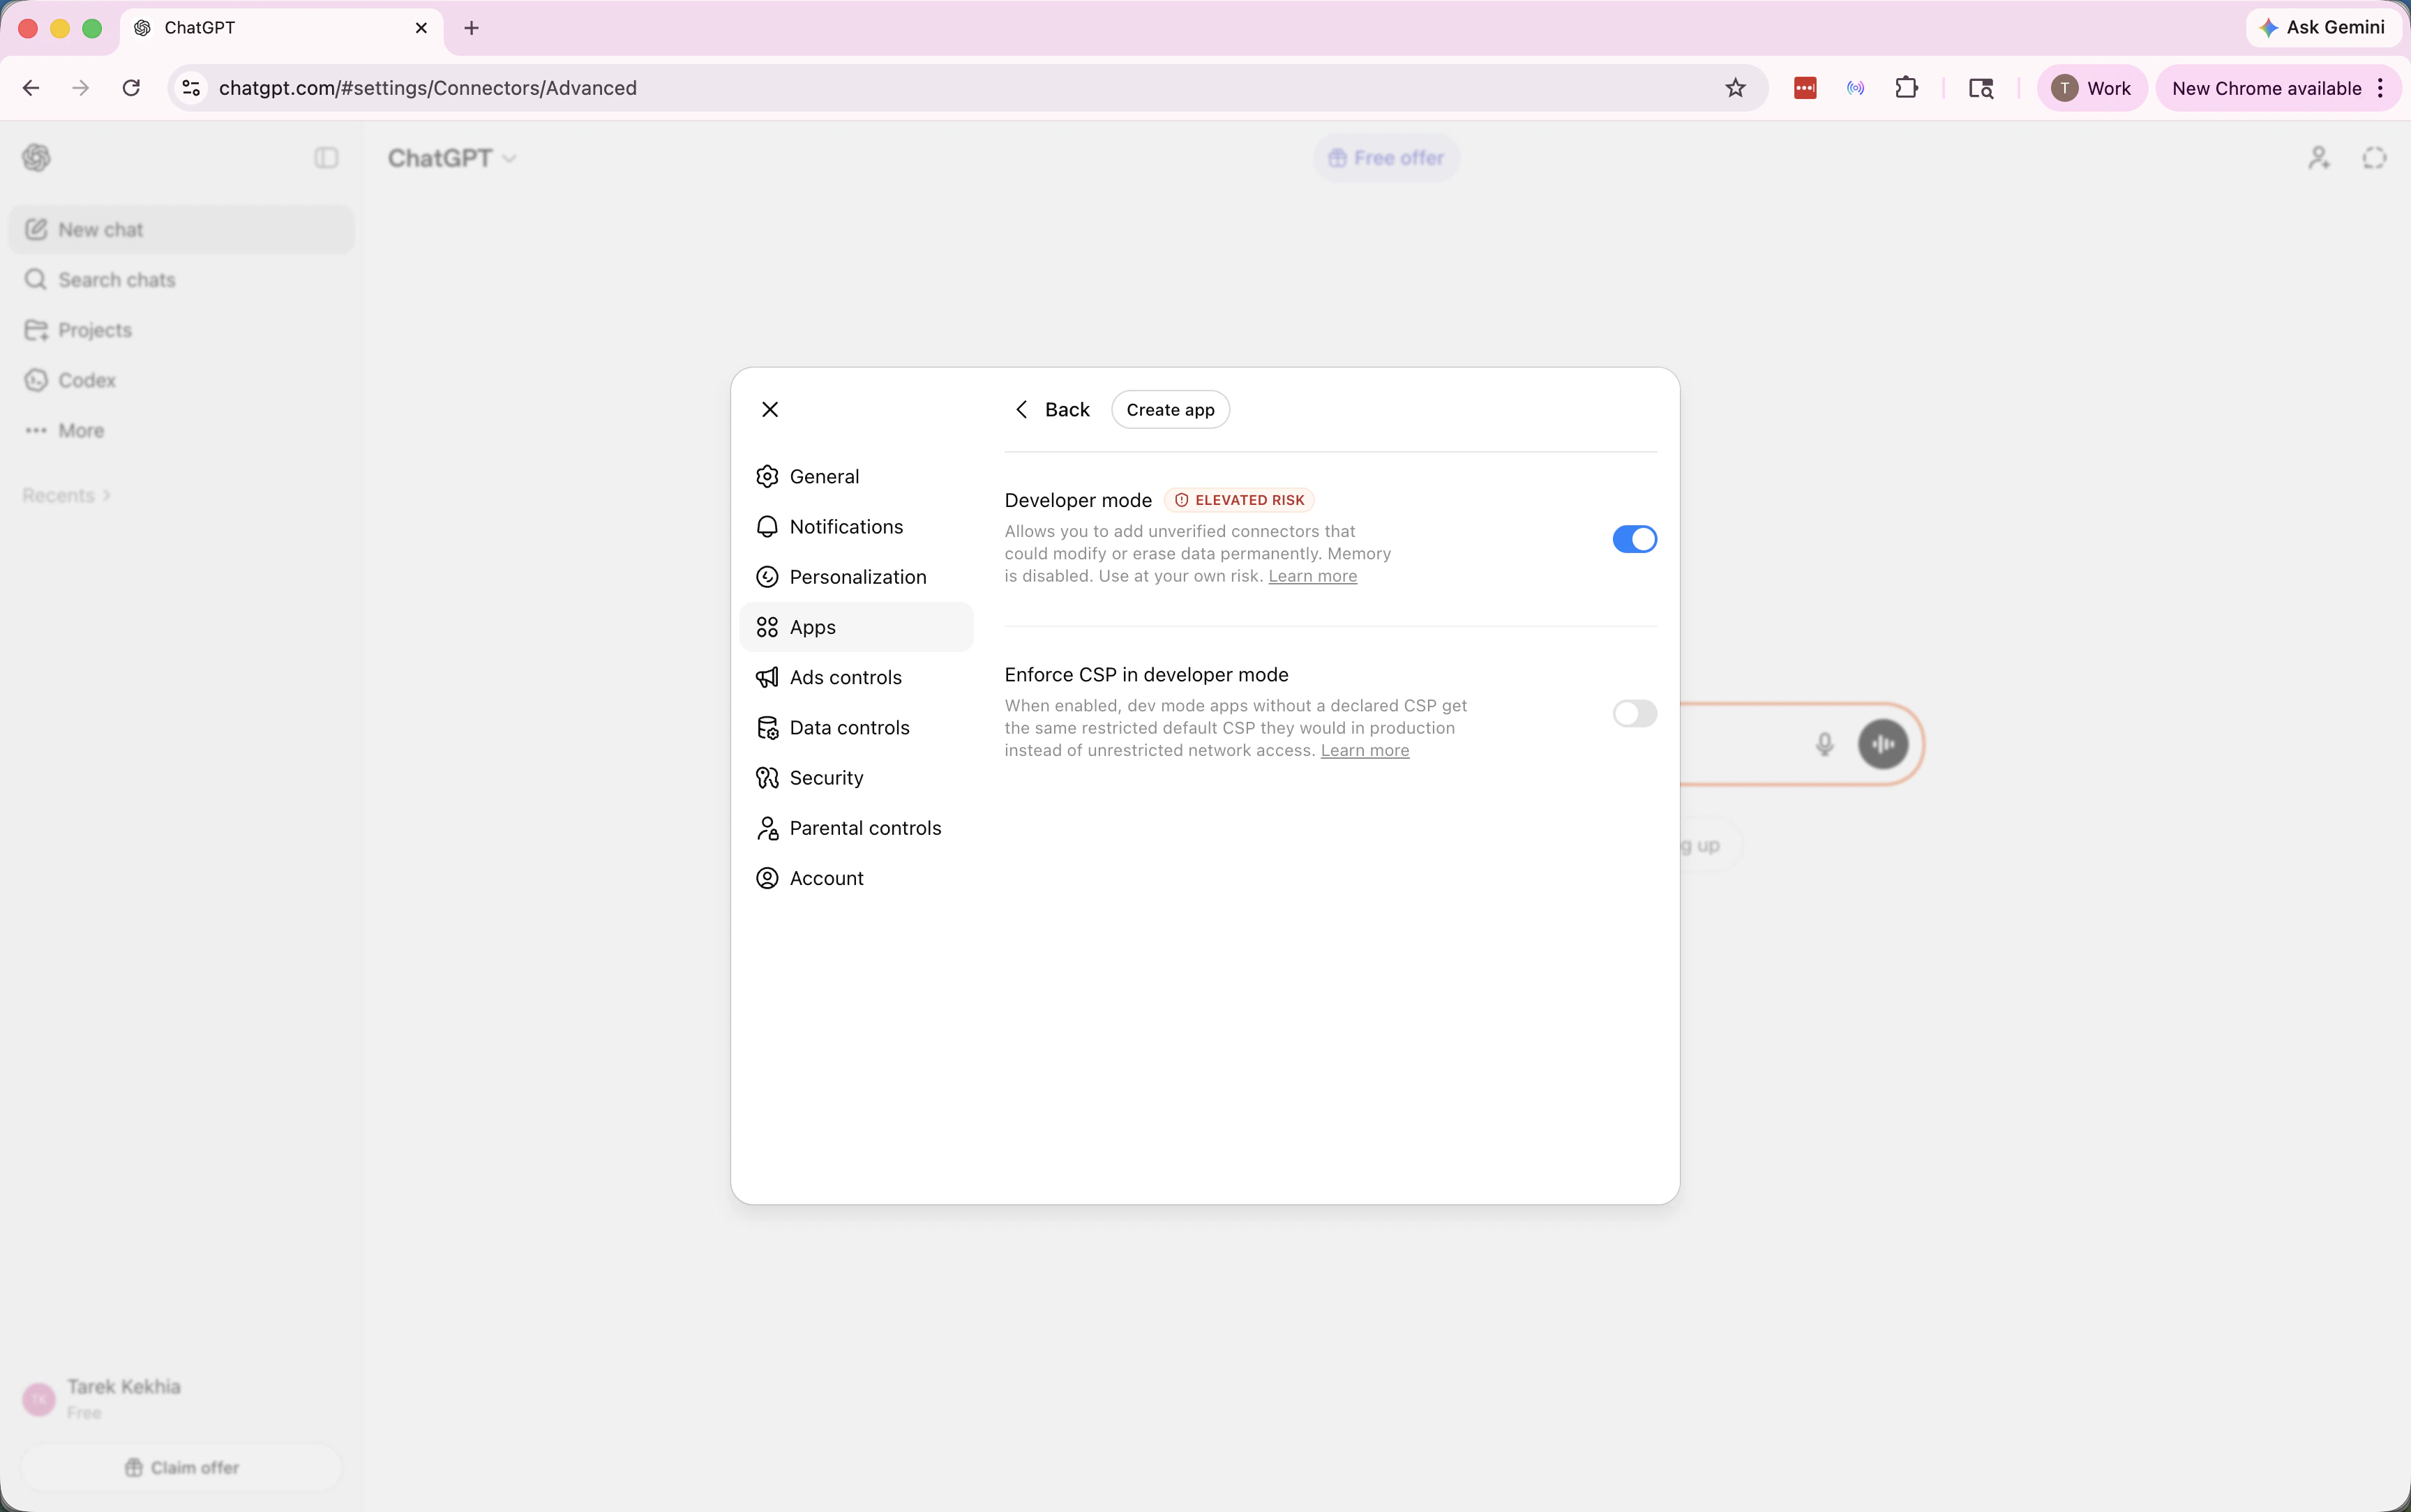
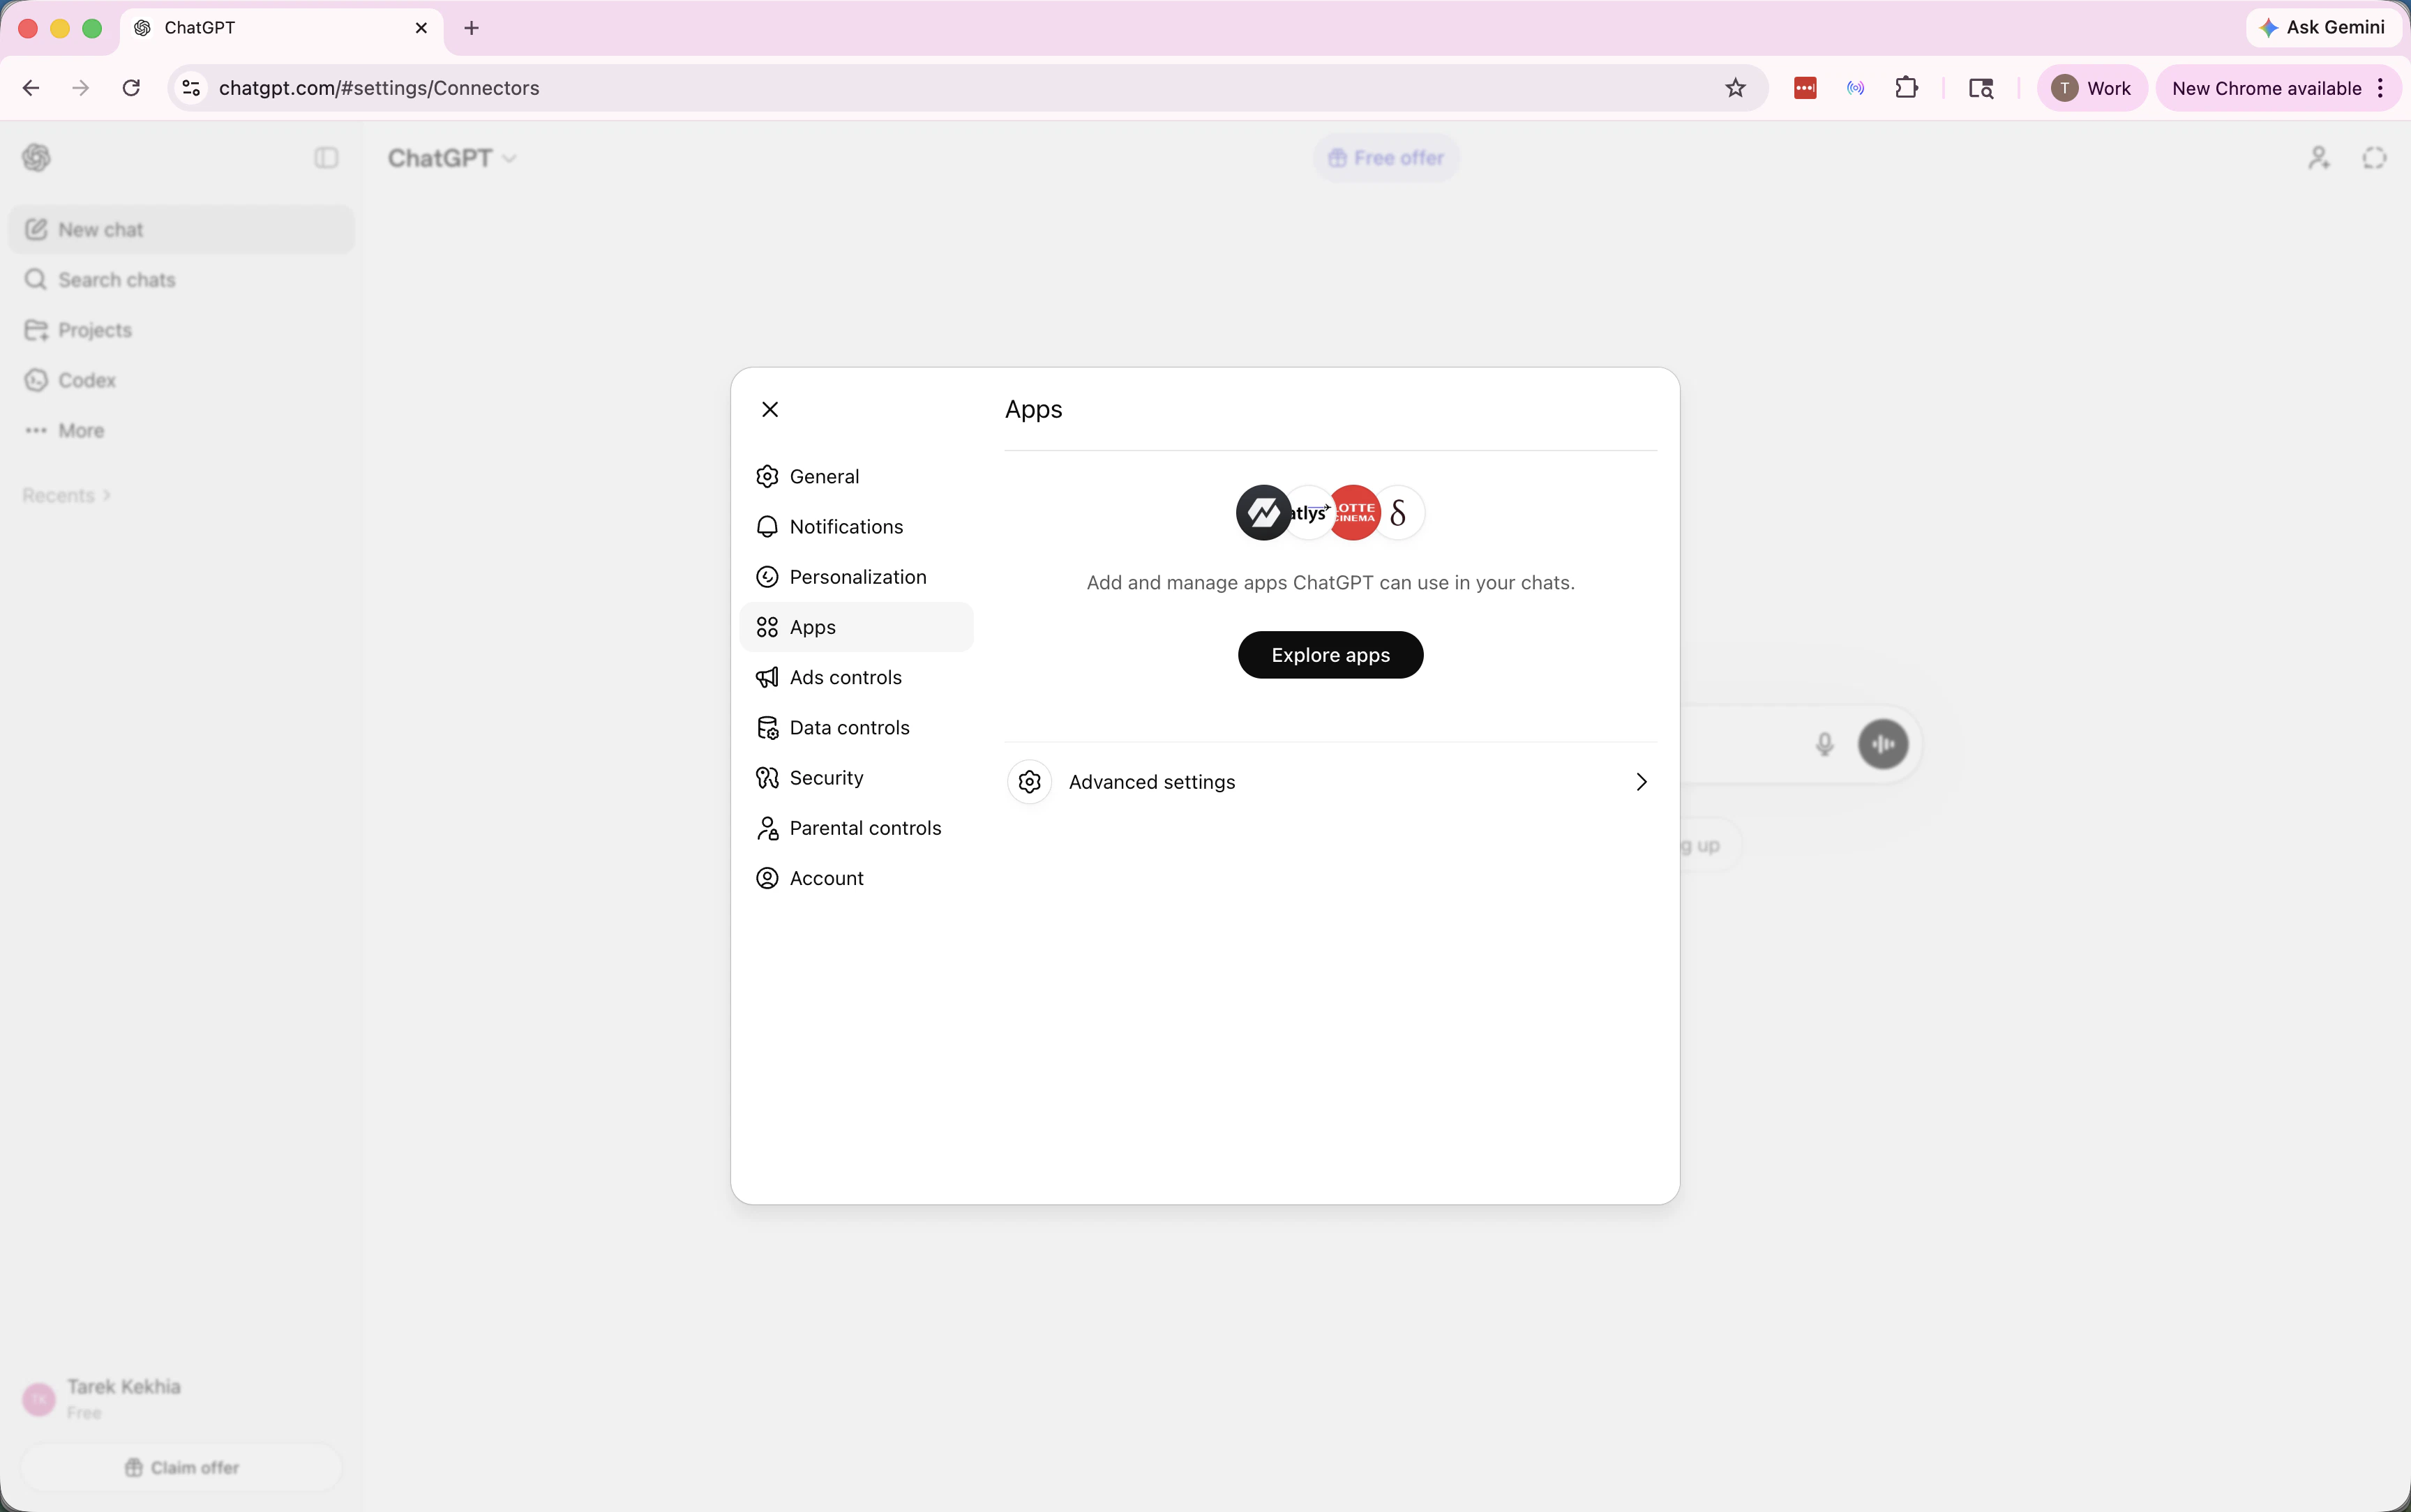 Turn on **Developer mode**, then click **Create**.
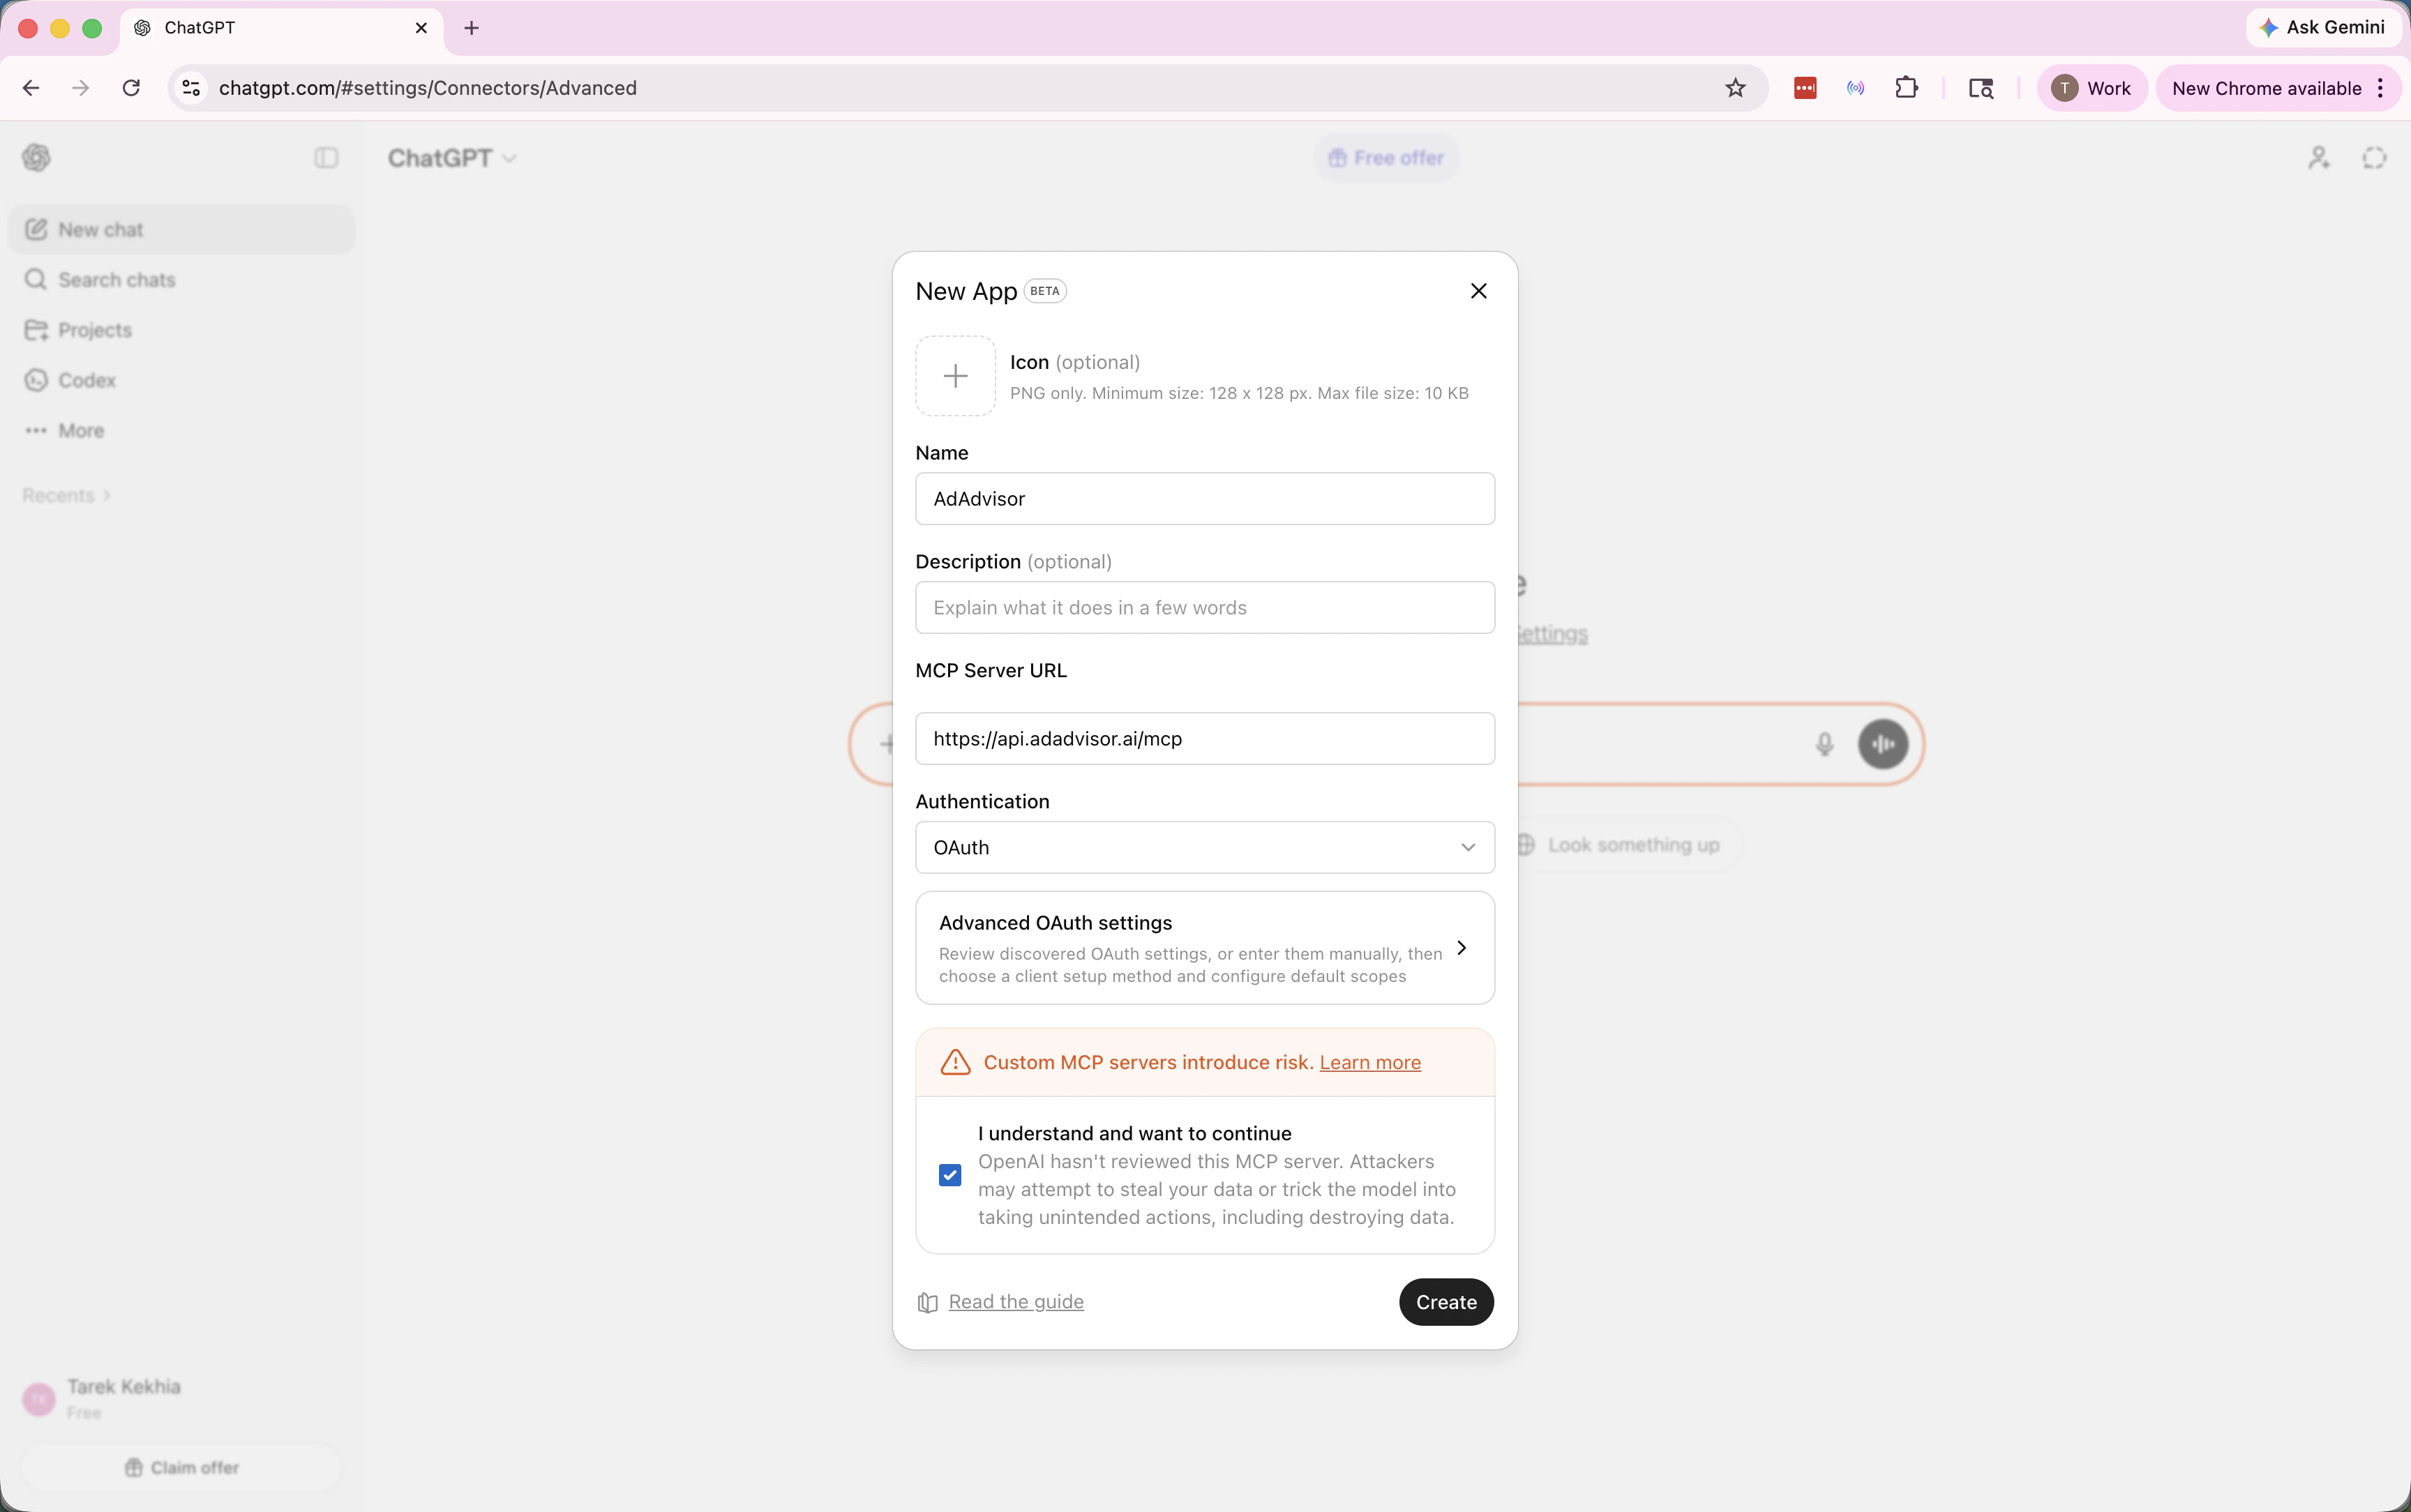
 Name it **AdAdvisor**, paste `https://api.adadvisor.ai/mcp` as the MCP URL, accept the safety warning, and click **Create**.
 Sign in to AdAdvisor and click **Authorize ChatGPT** to grant access.
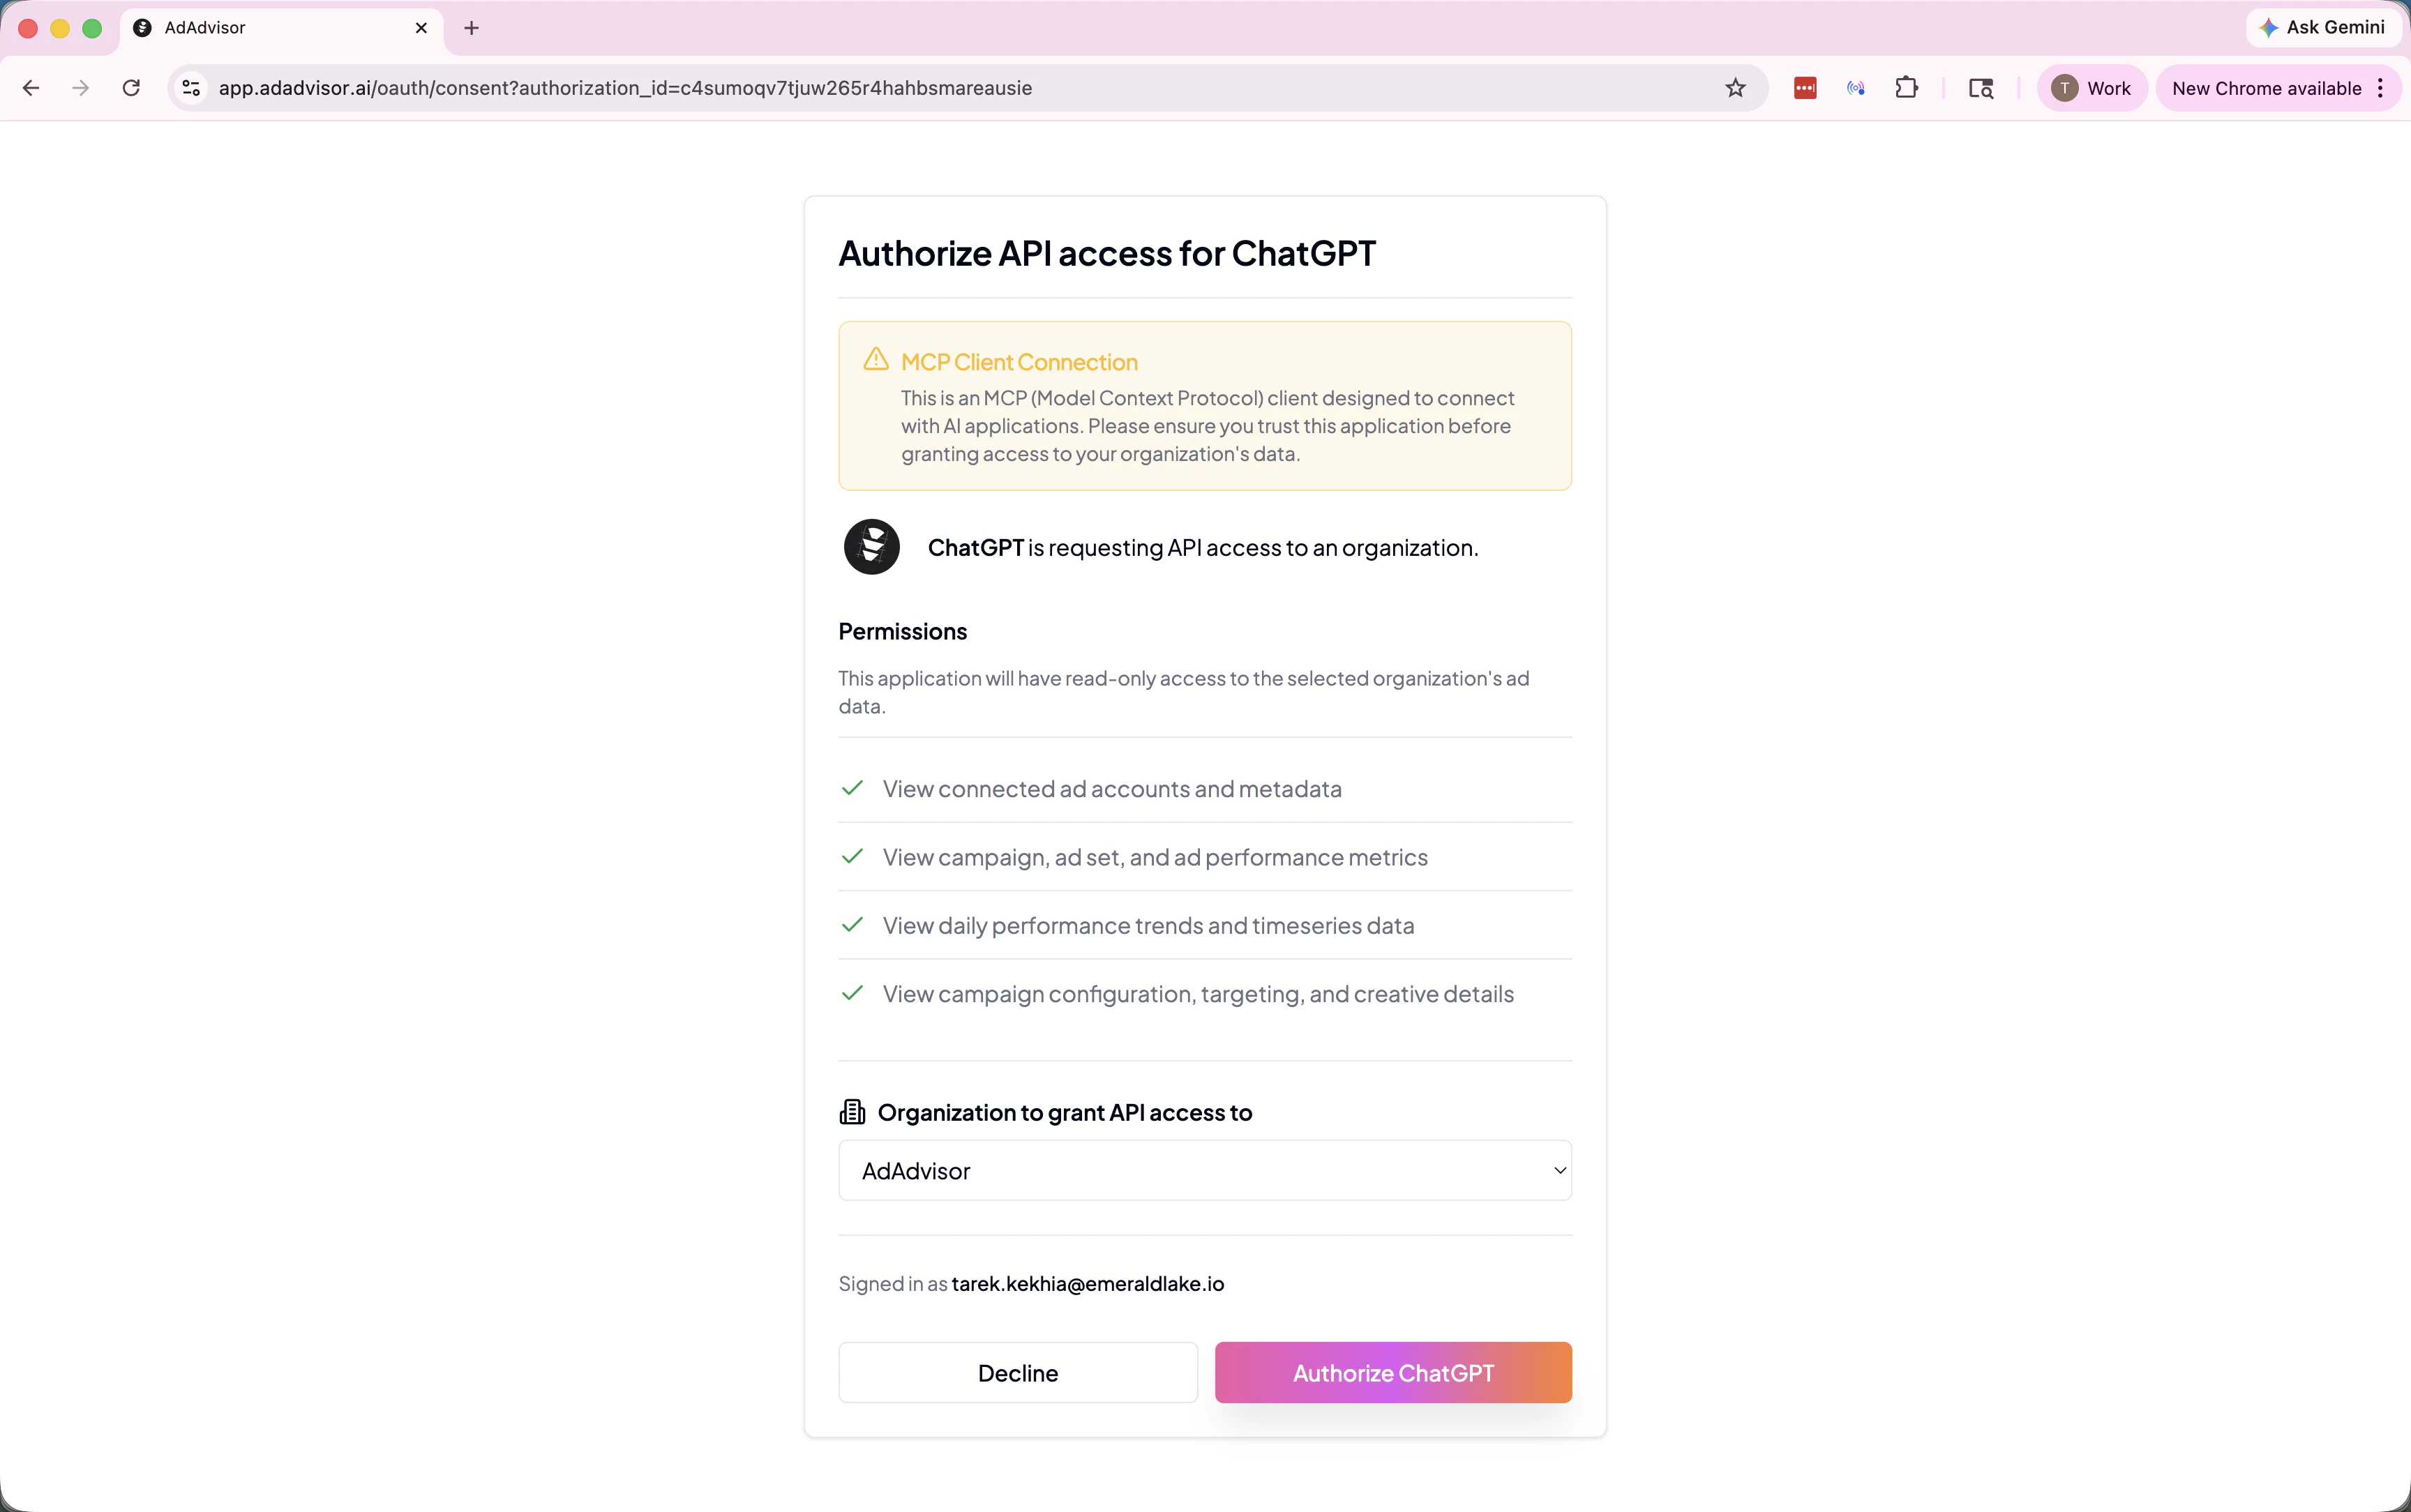 AdAdvisor is connected. Open the connector menu in any chat to use AdAdvisor tools.
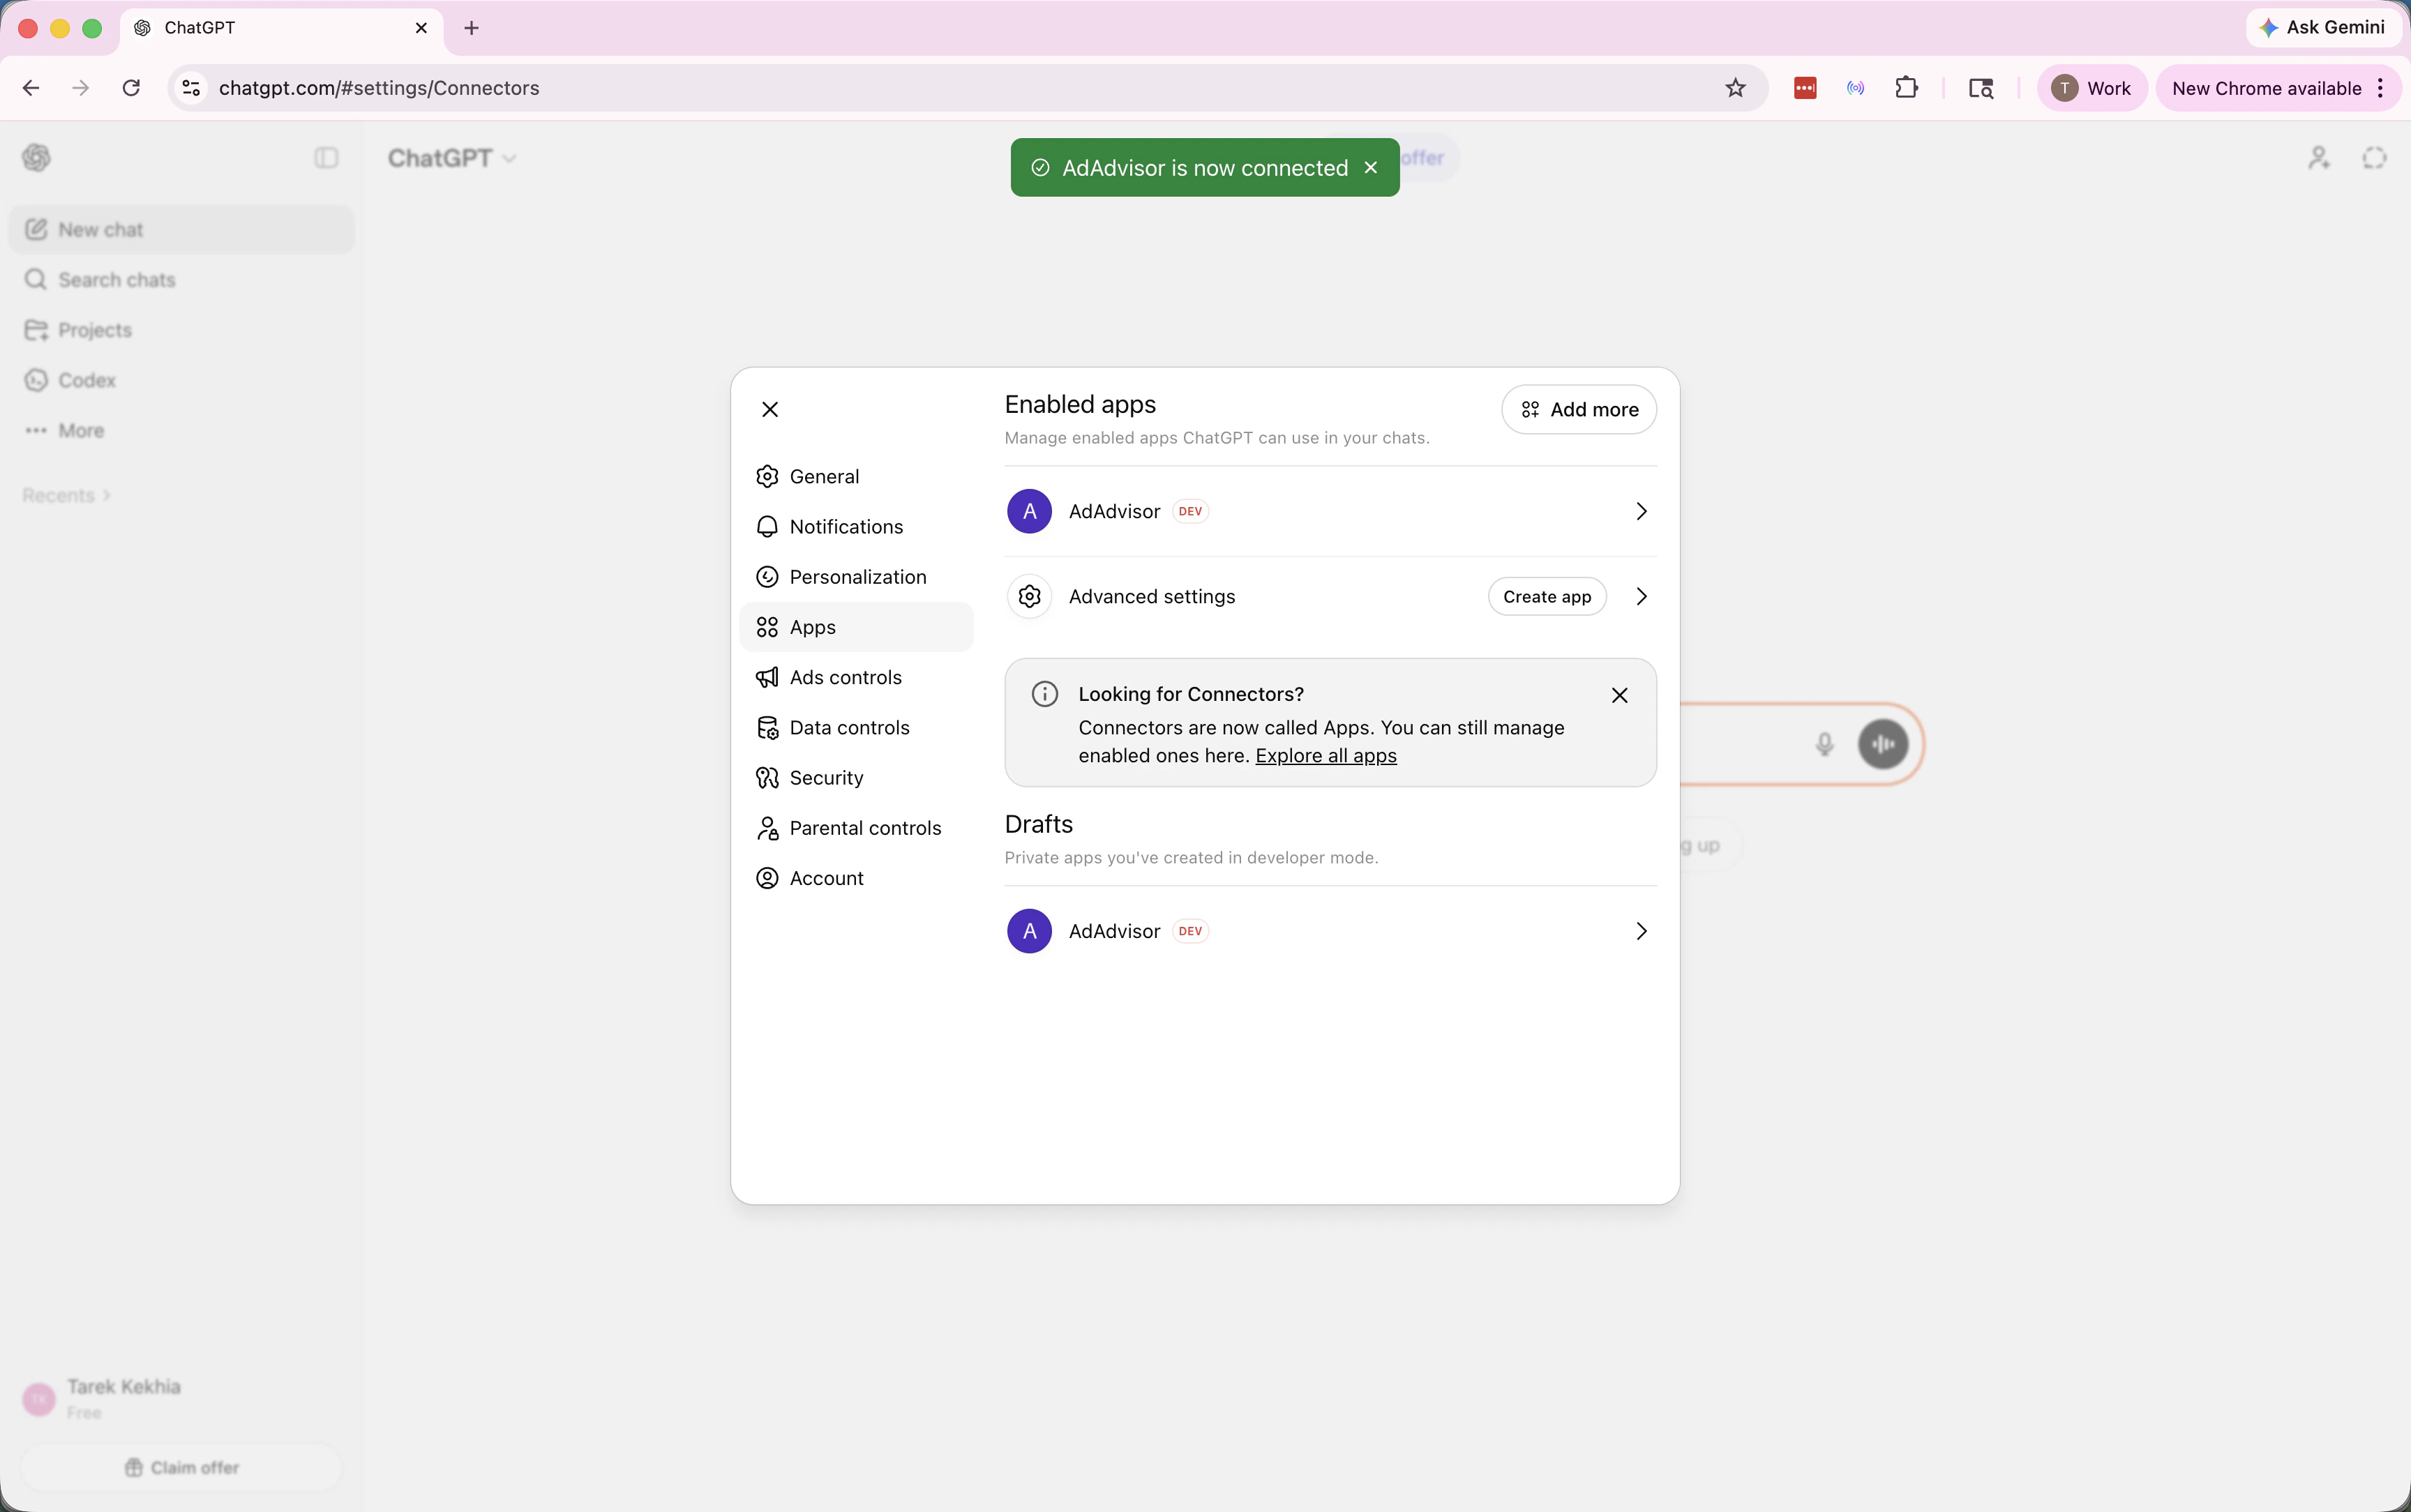 Available on ChatGPT Pro, Plus, Team, Enterprise, and Edu plans.
Claude Code runs in the terminal and supports both OAuth and API key authentication.
**Option 1: OAuth (recommended)**
Run this command to add AdAdvisor as an MCP server. Use `--scope user` to make it available across all projects, or omit it to add for the current project only.
```bash theme={null}
claude mcp add adadvisor \
--transport http \
--scope user \
https://api.adadvisor.ai/mcp
```
Run `/mcp` inside Claude Code (or `claude mcp list` in your terminal). The `adadvisor` server will appear, marked as **needs authentication**.
Available on ChatGPT Pro, Plus, Team, Enterprise, and Edu plans.
Claude Code runs in the terminal and supports both OAuth and API key authentication.
**Option 1: OAuth (recommended)**
Run this command to add AdAdvisor as an MCP server. Use `--scope user` to make it available across all projects, or omit it to add for the current project only.
```bash theme={null}
claude mcp add adadvisor \
--transport http \
--scope user \
https://api.adadvisor.ai/mcp
```
Run `/mcp` inside Claude Code (or `claude mcp list` in your terminal). The `adadvisor` server will appear, marked as **needs authentication**.
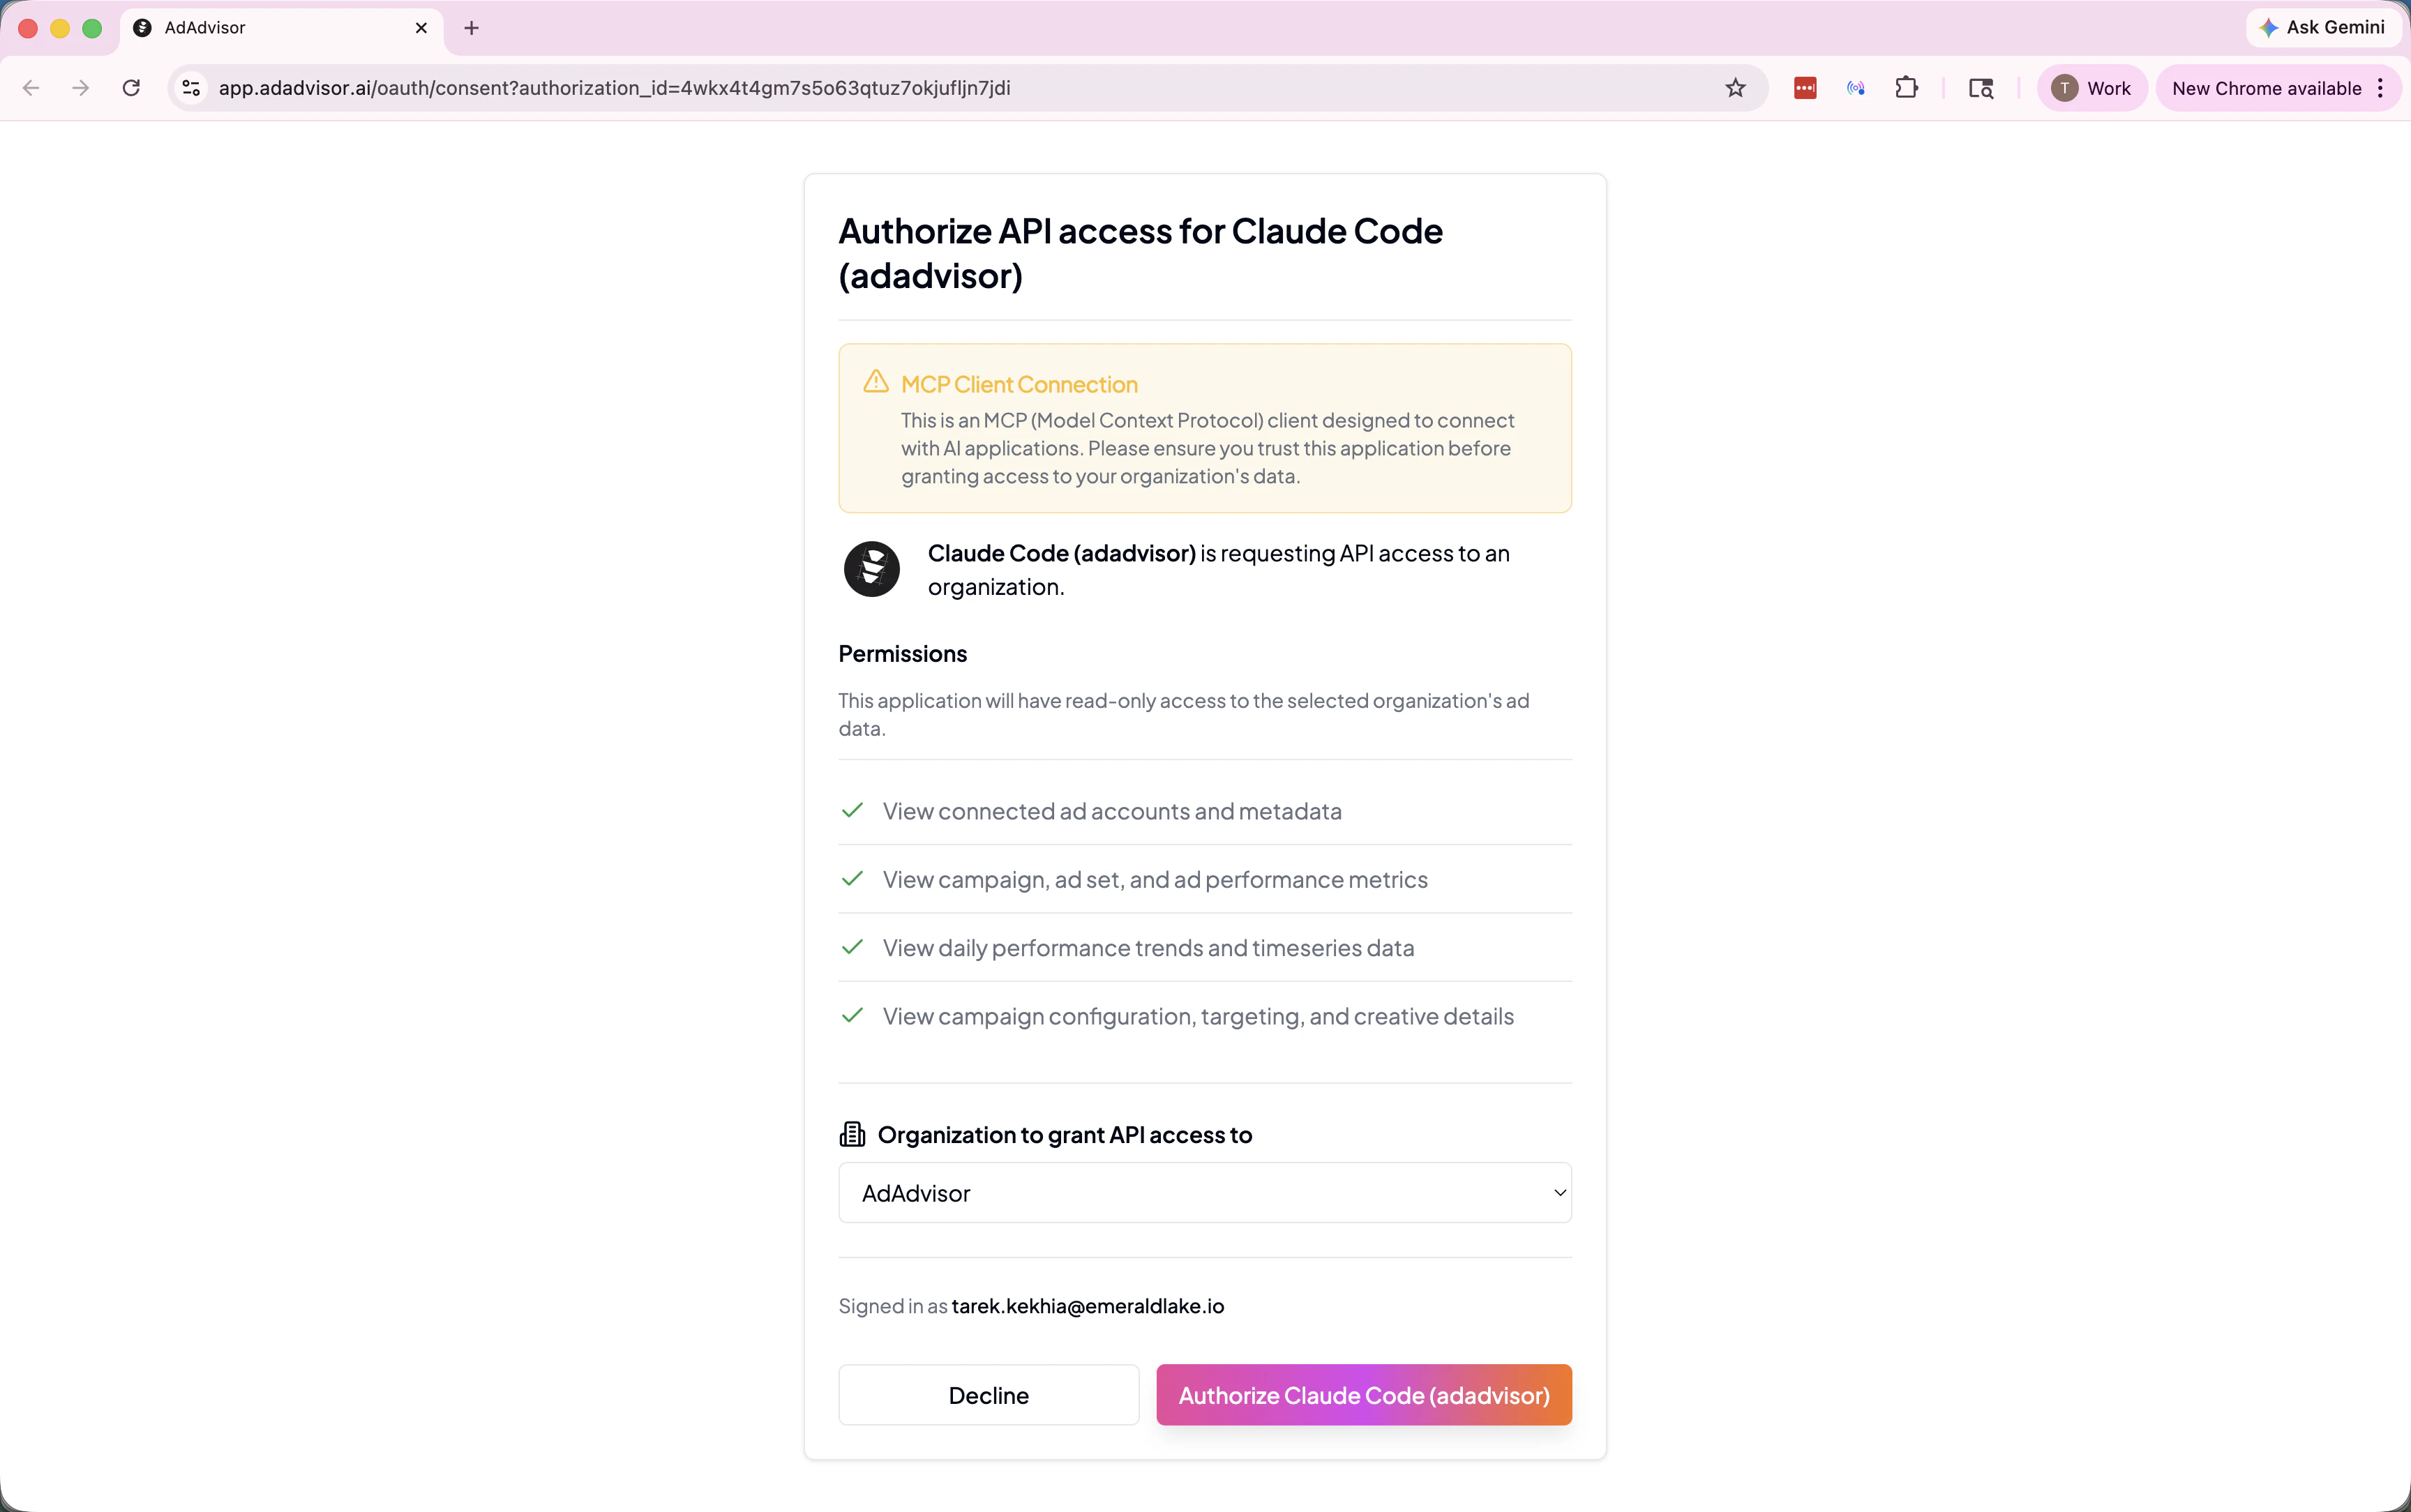
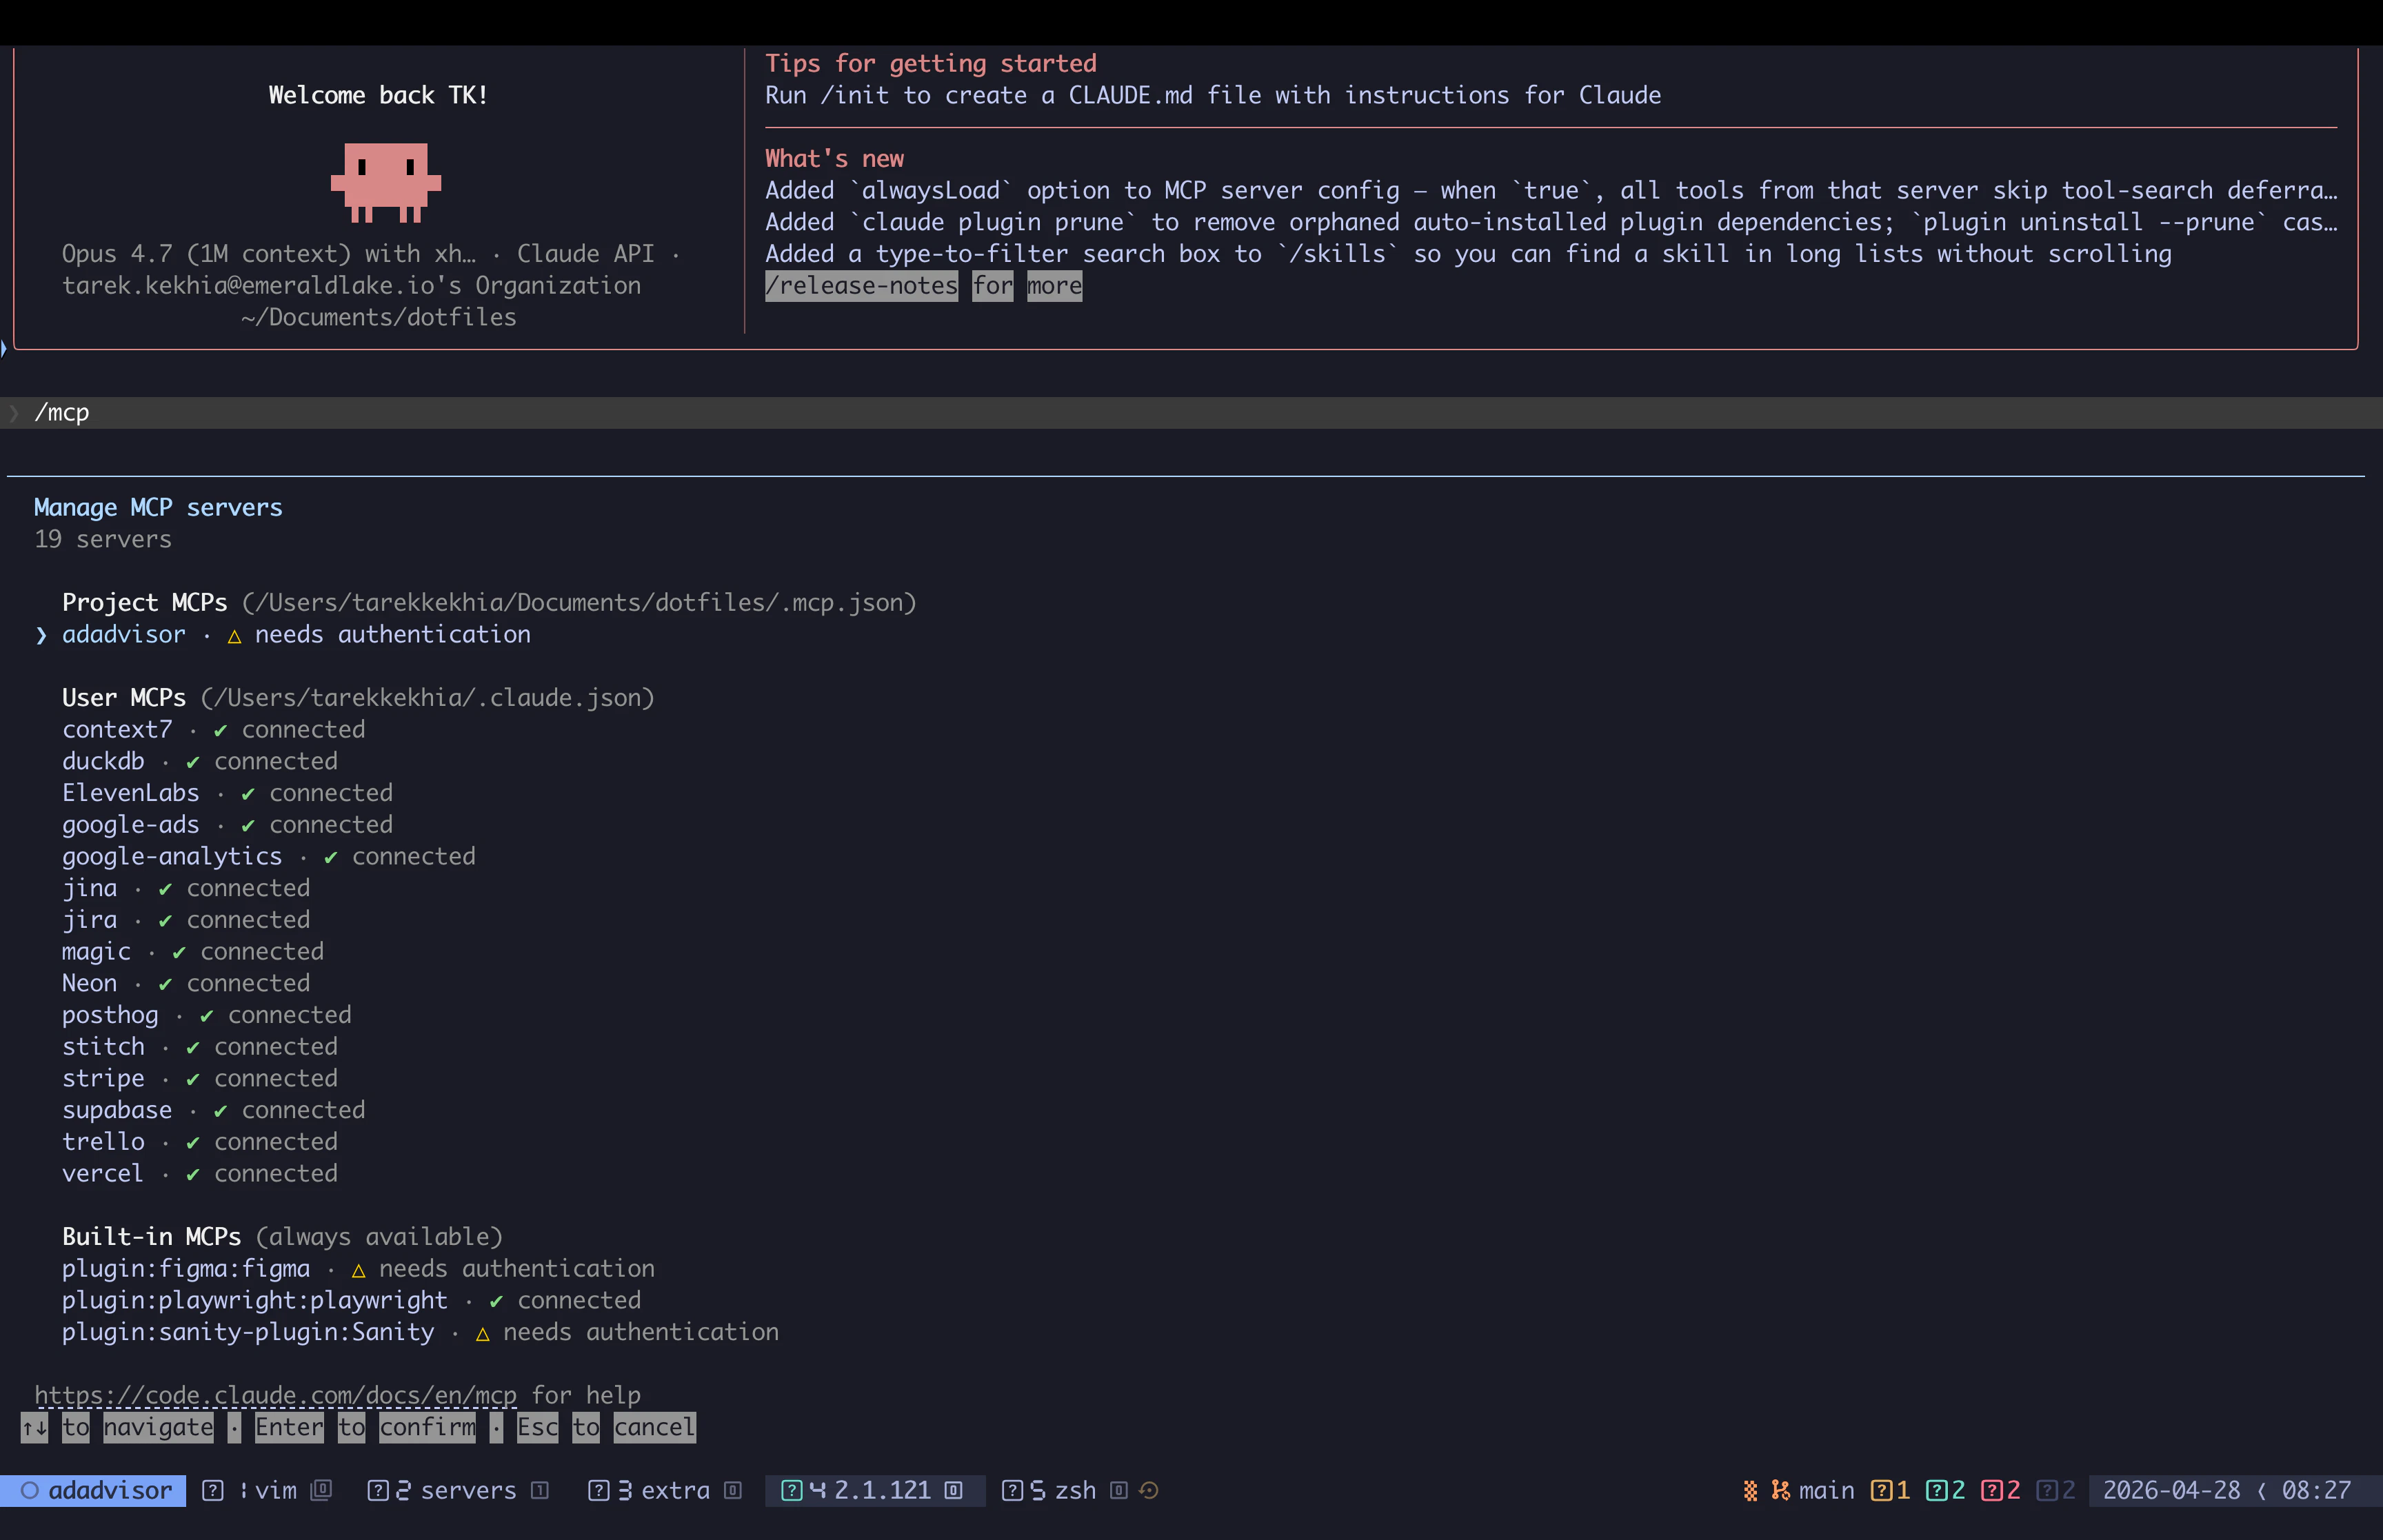 Select the `adadvisor` server and choose **Authenticate**. Claude Code will open your browser to AdAdvisor's OAuth page.
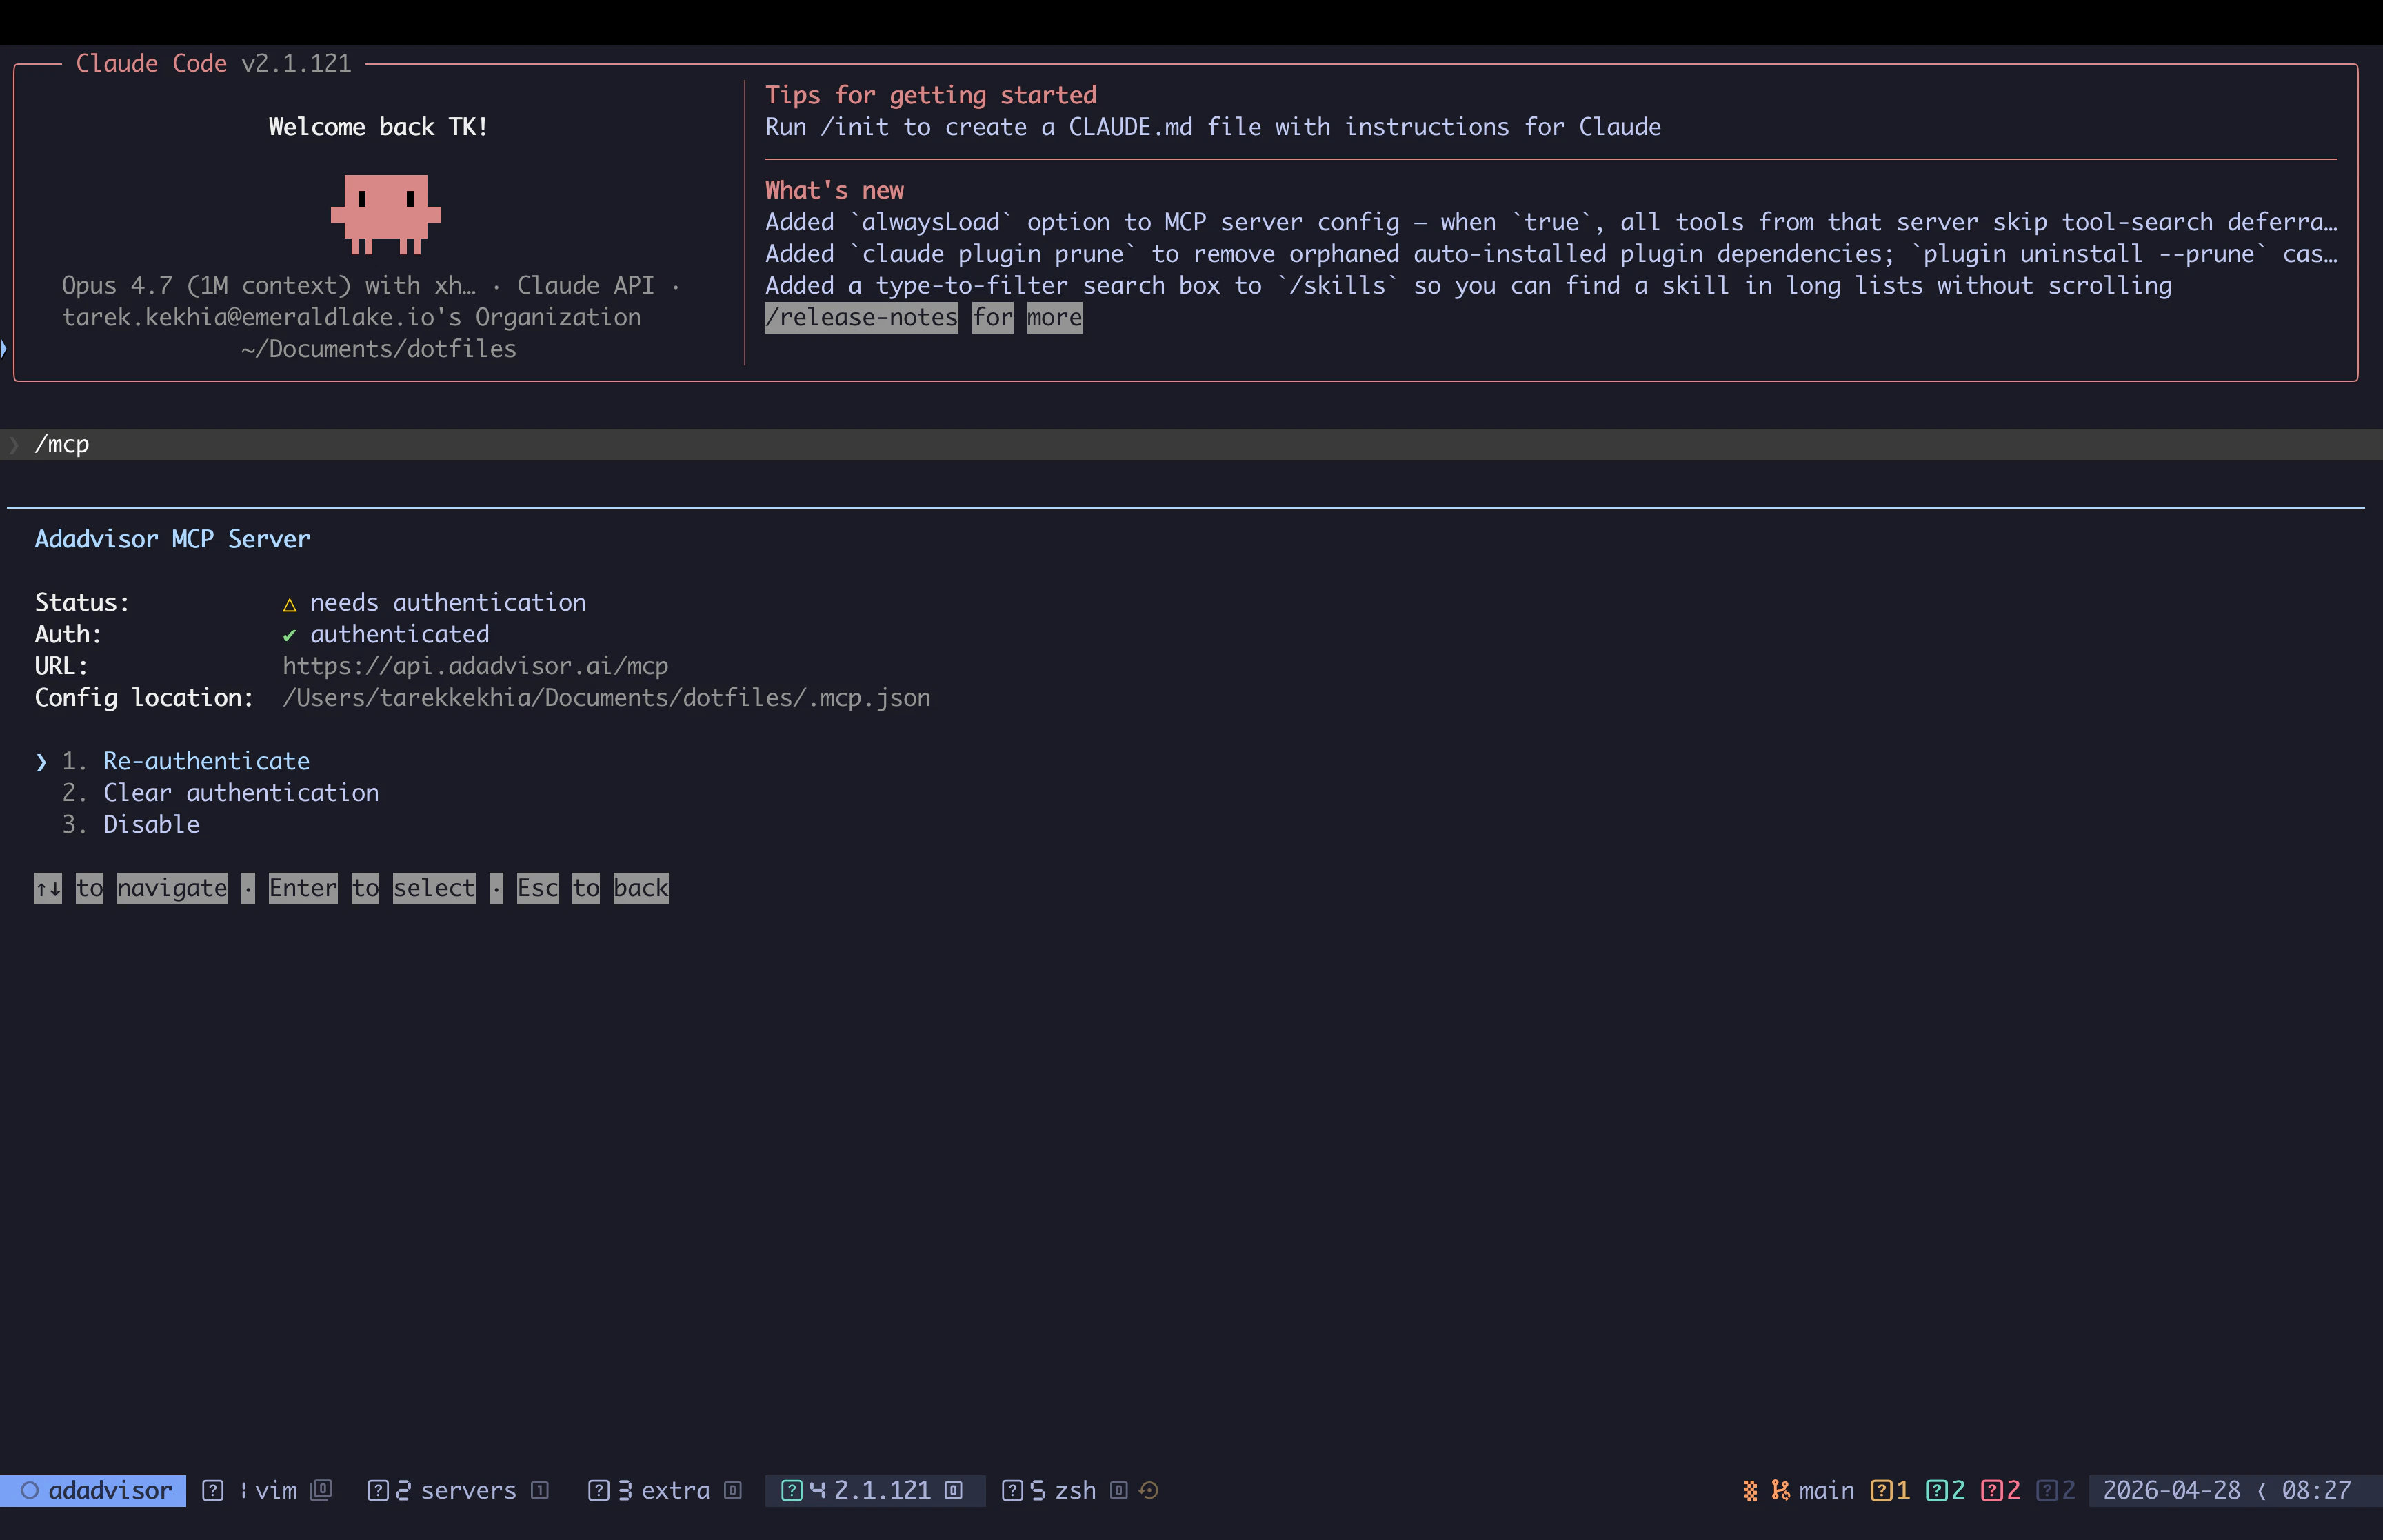 Sign in to AdAdvisor and click **Authorize Claude Code (adadvisor)** to grant read access to your campaign data.
 **Option 2: API Key**
If you prefer using an API key, run:
```bash theme={null}
claude mcp add adadvisor \
--transport http \
https://api.adadvisor.ai/mcp \
-- --header "Authorization: Bearer YOUR_API_KEY"
```
Or add it to your `.mcp.json` file in your project root:
```json .mcp.json theme={null}
{
"mcpServers": {
"adadvisor": {
"type": "http",
"url": "https://api.adadvisor.ai/mcp",
"headers": {
"Authorization": "Bearer YOUR_API_KEY"
}
}
}
}
```
Any MCP-compatible client that supports remote HTTP servers should work. Use these values:
| Setting | Value |
| -------------- | ---------------------------------------------------- |
| **Server URL** | `https://api.adadvisor.ai/mcp` |
| **Transport** | HTTP (Streamable HTTP) |
| **Auth** | OAuth 2.0 or Bearer token via `Authorization` header |
**Using mcp-remote for legacy clients**
If your client doesn't natively support remote HTTP MCP servers (only supports stdio), you can use `mcp-remote` as a bridge:
```json theme={null}
{
"mcpServers": {
"adadvisor": {
"command": "npx",
"args": [
"mcp-remote",
"https://api.adadvisor.ai/mcp",
"--transport",
"http-only"
]
}
}
}
```
This runs a local proxy that translates between stdio and HTTP, so older clients can connect to the remote server.
## Verifying the connection
After adding the server, try asking your AI assistant something about your ad data. For example:
```
What campaigns are currently running in my ad account?
```
```
Show me my top performing ad sets by ROAS this month.
```
```
What's my average CPC across all active campaigns?
```
If everything is set up correctly, the assistant will connect to AdAdvisor, pull your data, and return results grounded in your actual campaign performance.
## Troubleshooting
### Authentication errors (401 Unauthorized)
**If using API key auth:**
* Verify the key hasn't been revoked or expired in **Settings > MCP Server**
* Make sure the `Authorization` header format is exactly `Bearer YOUR_API_KEY` (with a space after "Bearer")
* Create a new key if needed. See [Managing API Keys](/ai/managing-api-keys)
**If using OAuth:**
* OAuth sessions can expire. Re-authenticate by triggering a new connection from your client:
* **Claude Code**: Remove and re-add the server with `claude mcp remove adadvisor` then re-run the add command
* **Claude Desktop / ChatGPT**: Open the connector settings, disconnect AdAdvisor, then reconnect
* **Other clients**: Remove the server entry from your config, restart the client, and re-add it
### Server not appearing or tools not loading
* Double-check the URL is exactly `https://api.adadvisor.ai/mcp` (no trailing slash, no typos)
* Restart your client after editing the config file. Most clients don't hot-reload MCP config changes.
* Make sure you're editing the correct config file for your client (project-level vs global)
* If your client uses a JSON config file, check that the JSON is valid. A missing comma or bracket will silently fail.
### No data returned
* Verify your Meta ad account is connected in AdAdvisor and the initial data sync has completed. Check **Settings > Connected Accounts**.
* Make sure the business you're querying has active campaigns with data in the date range you're asking about.
### Connection timeout
* If you're behind a corporate firewall or VPN, make sure outbound HTTPS connections to `api.adadvisor.ai` aren't blocked.
* Try the `mcp-remote` proxy method (see the "Other clients" tab above) if your client has trouble with direct HTTP connections.
## Security best practices
* **Use OAuth when possible.** It's more secure than static API keys and handles token rotation automatically.
* **One API key per client.** If a key is compromised, you only need to revoke and replace that one without affecting other tools.
* **Set expiration dates** on API keys for shared machines or temporary setups.
* **Don't commit keys to git.** Use environment variables or your client's secure input mechanism instead of hardcoding keys in config files.
## Finding the setup instructions in AdAdvisor
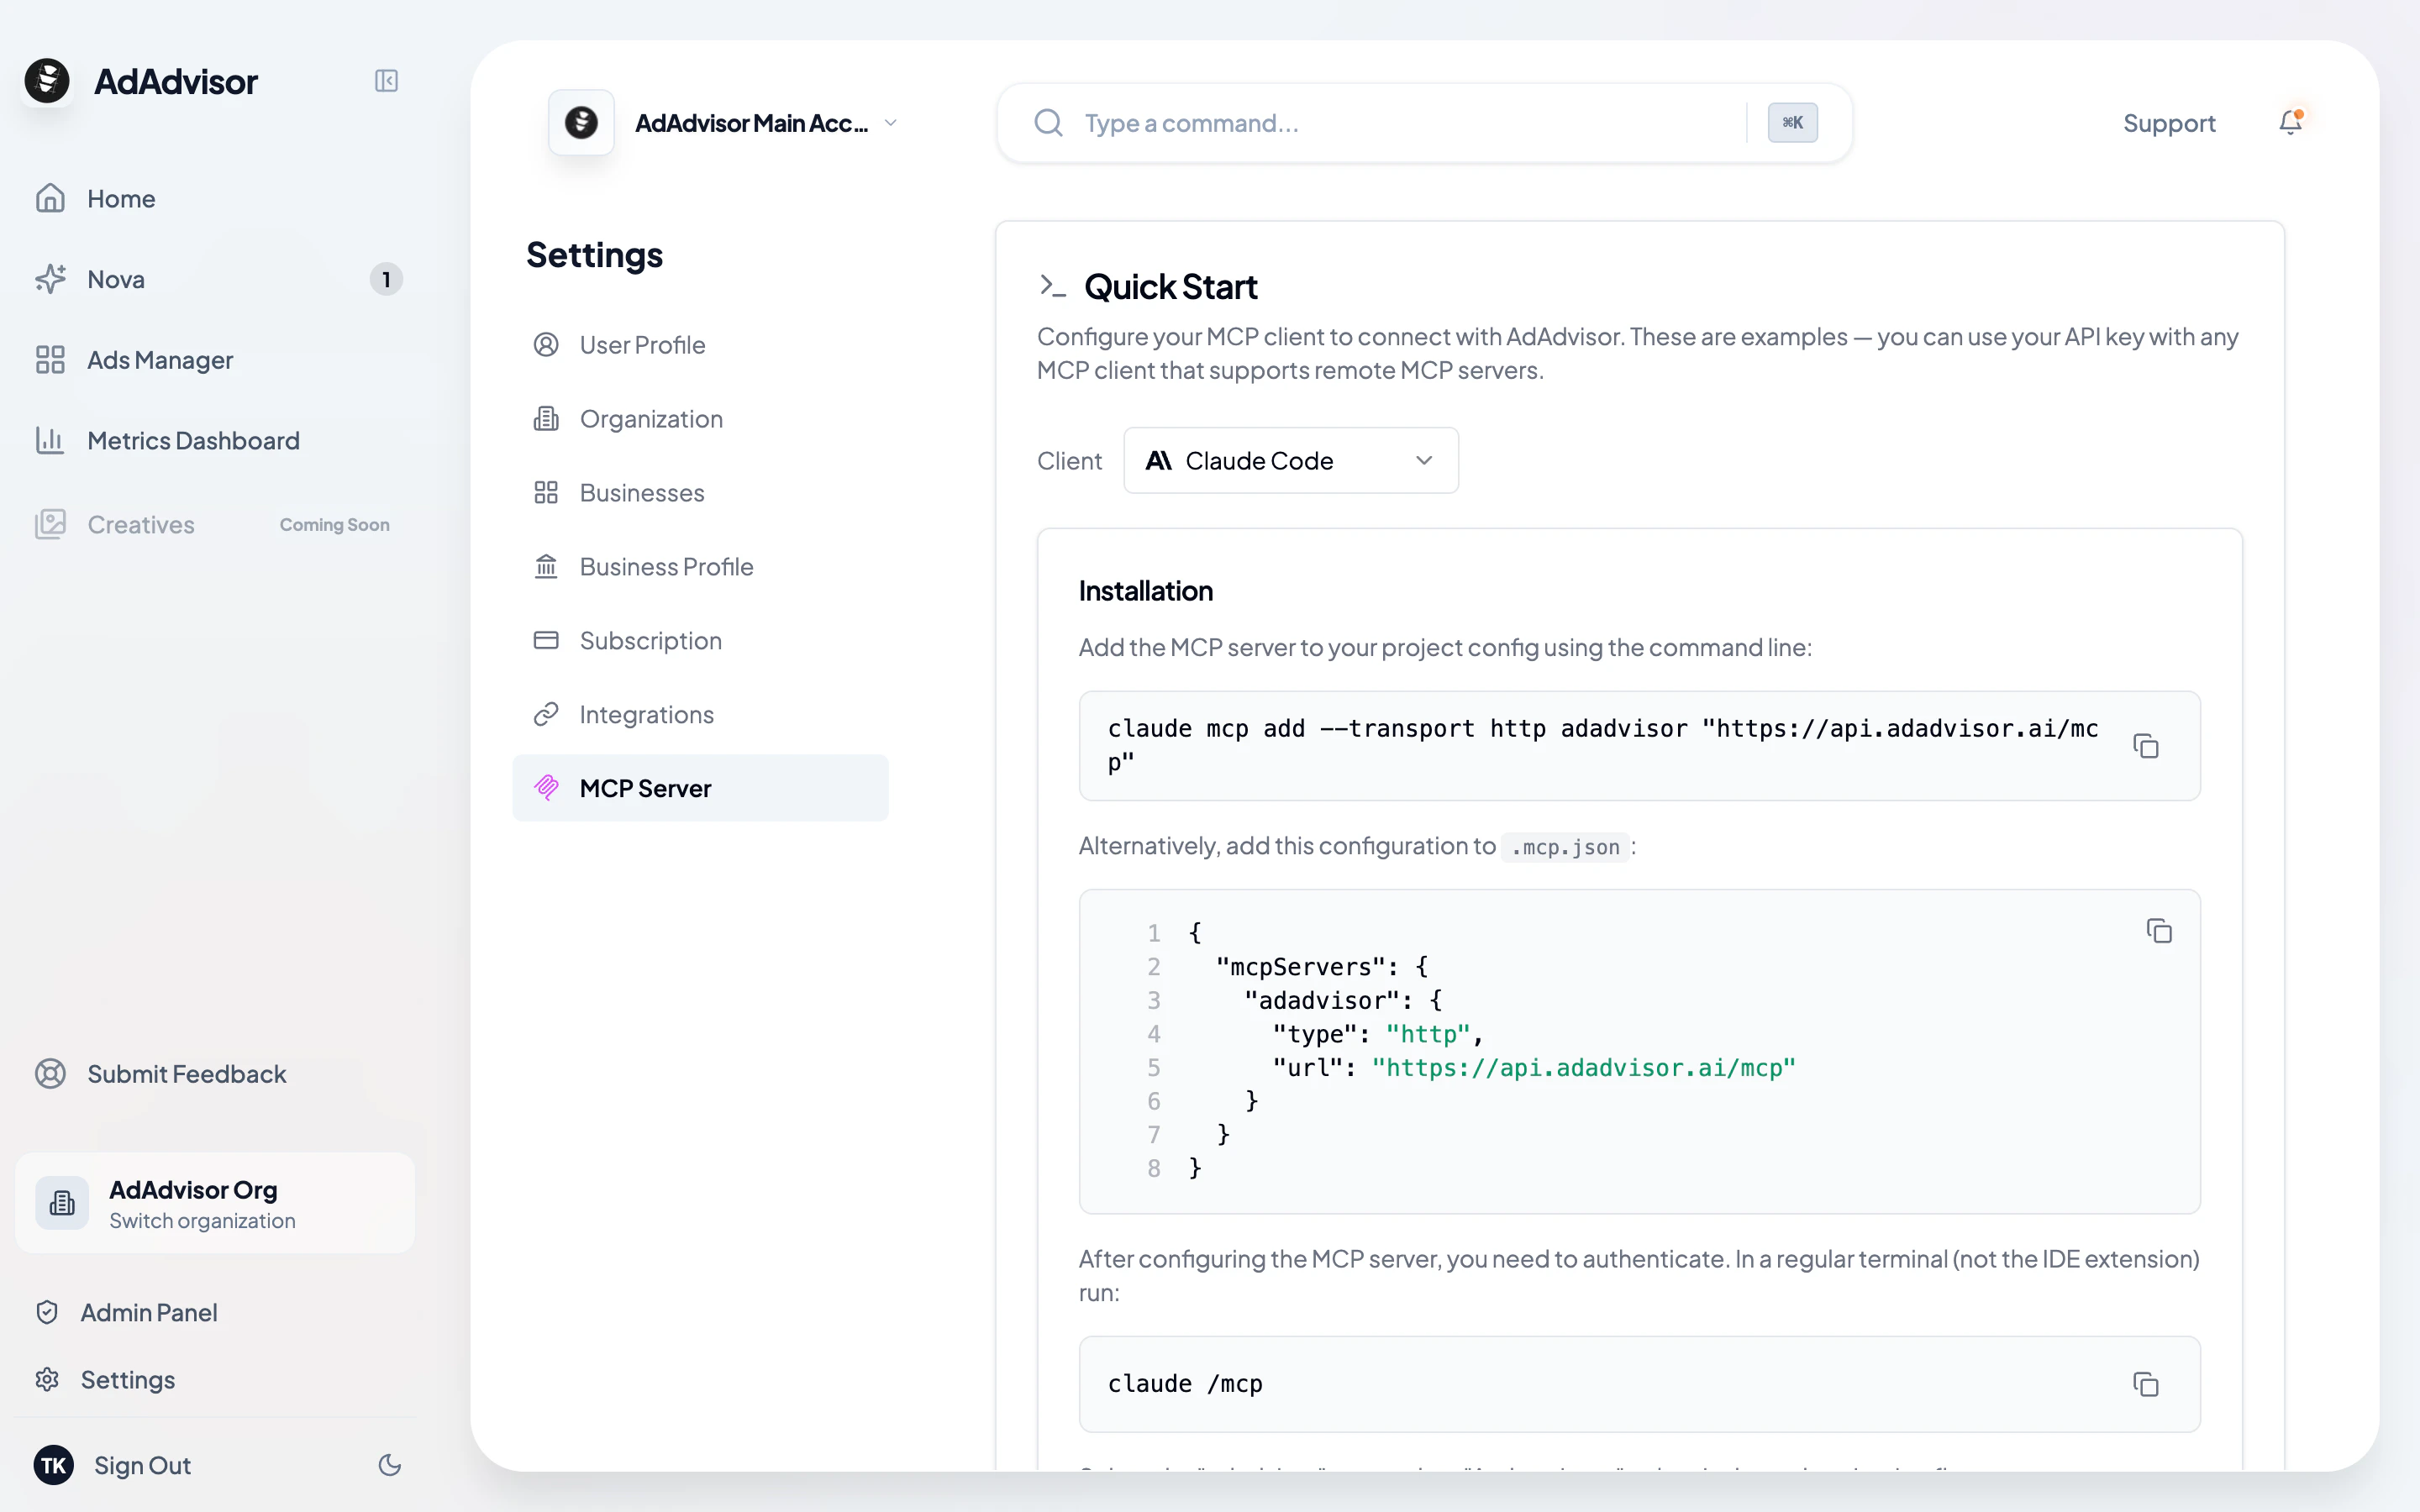
You can also find these instructions directly in the app. Go to **Settings > MCP Server** and scroll down to the "Quick Start" section. Select your client from the dropdown and the instructions (with code blocks you can copy) will appear.
**Option 2: API Key**
If you prefer using an API key, run:
```bash theme={null}
claude mcp add adadvisor \
--transport http \
https://api.adadvisor.ai/mcp \
-- --header "Authorization: Bearer YOUR_API_KEY"
```
Or add it to your `.mcp.json` file in your project root:
```json .mcp.json theme={null}
{
"mcpServers": {
"adadvisor": {
"type": "http",
"url": "https://api.adadvisor.ai/mcp",
"headers": {
"Authorization": "Bearer YOUR_API_KEY"
}
}
}
}
```
Any MCP-compatible client that supports remote HTTP servers should work. Use these values:
| Setting | Value |
| -------------- | ---------------------------------------------------- |
| **Server URL** | `https://api.adadvisor.ai/mcp` |
| **Transport** | HTTP (Streamable HTTP) |
| **Auth** | OAuth 2.0 or Bearer token via `Authorization` header |
**Using mcp-remote for legacy clients**
If your client doesn't natively support remote HTTP MCP servers (only supports stdio), you can use `mcp-remote` as a bridge:
```json theme={null}
{
"mcpServers": {
"adadvisor": {
"command": "npx",
"args": [
"mcp-remote",
"https://api.adadvisor.ai/mcp",
"--transport",
"http-only"
]
}
}
}
```
This runs a local proxy that translates between stdio and HTTP, so older clients can connect to the remote server.
## Verifying the connection
After adding the server, try asking your AI assistant something about your ad data. For example:
```
What campaigns are currently running in my ad account?
```
```
Show me my top performing ad sets by ROAS this month.
```
```
What's my average CPC across all active campaigns?
```
If everything is set up correctly, the assistant will connect to AdAdvisor, pull your data, and return results grounded in your actual campaign performance.
## Troubleshooting
### Authentication errors (401 Unauthorized)
**If using API key auth:**
* Verify the key hasn't been revoked or expired in **Settings > MCP Server**
* Make sure the `Authorization` header format is exactly `Bearer YOUR_API_KEY` (with a space after "Bearer")
* Create a new key if needed. See [Managing API Keys](/ai/managing-api-keys)
**If using OAuth:**
* OAuth sessions can expire. Re-authenticate by triggering a new connection from your client:
* **Claude Code**: Remove and re-add the server with `claude mcp remove adadvisor` then re-run the add command
* **Claude Desktop / ChatGPT**: Open the connector settings, disconnect AdAdvisor, then reconnect
* **Other clients**: Remove the server entry from your config, restart the client, and re-add it
### Server not appearing or tools not loading
* Double-check the URL is exactly `https://api.adadvisor.ai/mcp` (no trailing slash, no typos)
* Restart your client after editing the config file. Most clients don't hot-reload MCP config changes.
* Make sure you're editing the correct config file for your client (project-level vs global)
* If your client uses a JSON config file, check that the JSON is valid. A missing comma or bracket will silently fail.
### No data returned
* Verify your Meta ad account is connected in AdAdvisor and the initial data sync has completed. Check **Settings > Connected Accounts**.
* Make sure the business you're querying has active campaigns with data in the date range you're asking about.
### Connection timeout
* If you're behind a corporate firewall or VPN, make sure outbound HTTPS connections to `api.adadvisor.ai` aren't blocked.
* Try the `mcp-remote` proxy method (see the "Other clients" tab above) if your client has trouble with direct HTTP connections.
## Security best practices
* **Use OAuth when possible.** It's more secure than static API keys and handles token rotation automatically.
* **One API key per client.** If a key is compromised, you only need to revoke and replace that one without affecting other tools.
* **Set expiration dates** on API keys for shared machines or temporary setups.
* **Don't commit keys to git.** Use environment variables or your client's secure input mechanism instead of hardcoding keys in config files.
## Finding the setup instructions in AdAdvisor
You can also find these instructions directly in the app. Go to **Settings > MCP Server** and scroll down to the "Quick Start" section. Select your client from the dropdown and the instructions (with code blocks you can copy) will appear.